
Mini Pumpkin Halloween Menagerie
Mini Pumpkin Halloween Menagerie


This is a fun Halloween project that the whole family can do together. It requires a few pumpkins and a few craft supplies and a terrific four piece Halloween menagerie comes to life along with a bonus spooky bloodshot eyeball bonus craft. This is fun family project that everyone can enjoy.
What You’ll Need
- 5 mini pumpkins in a mesh bag
- Black felt or card stock
- Black patterned fabric or paper
- White patterned fabric or paper
- If using fabric — heavy-duty interfacing
- Halloween ribbon
- 4 large googly eyes and 2 small googly eyes
- 4 spider cupcake stands
- 2 pipe cleaners; 1 black and 1 orange
- White paint
- 1 large covered button
- craft glue or hot glue
- Small piece of white felt or paper

Step 1.

Step 2.
Wrap the mesh around each pumpkin and glue on the bottom. One pumpkin should be flat on the top with the stem sticking out and the other should have the knotted end with the excess mesh acting as a ponytail. Place a Halloween ribbon around the ponytail and glue 2 large googly eyes on each pumpkin. Then place each pumpkin on its own cupcake spider holder and voila you have a boy and girl Halloween spider pumpkins.

Step 3.
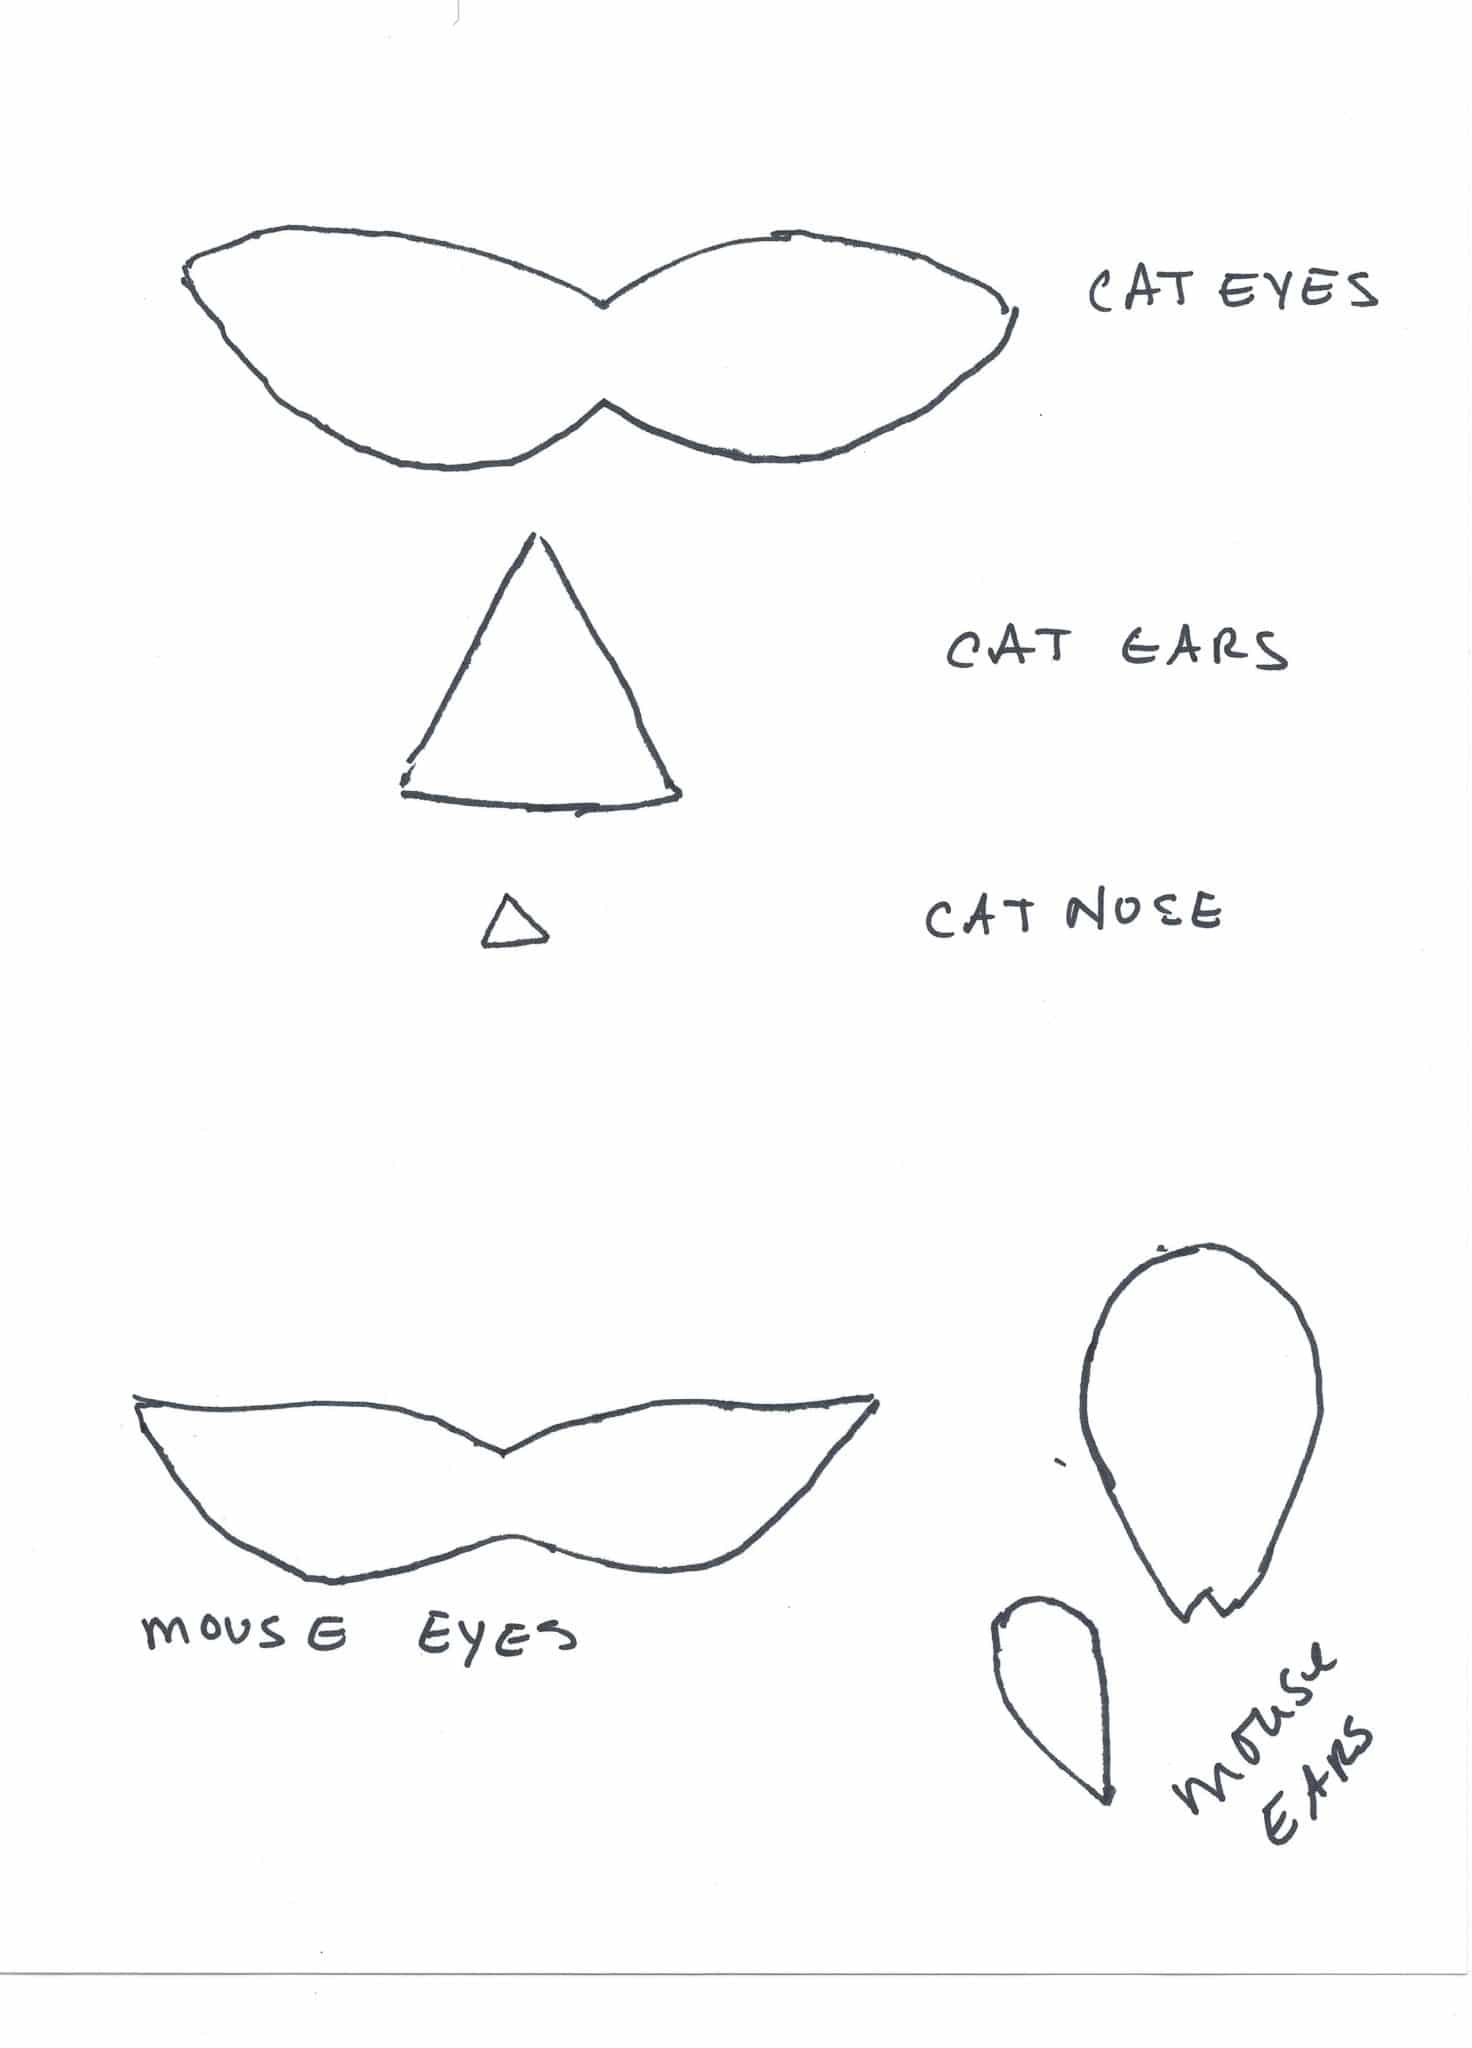
In the bag of mini pumpkins came a green pumpkin and a white pumpkin that I used to make a Halloween cat. I began by cutting out the shapes I needed for the eyes, ears, nose and whiskers of my cat. These shapes can be found at Pumpkin Faces. Just print them out and cut out the shapes. Use the shapes as your pattern on either the fabric or paper that you choose to use as the face pieces. I used fabric backed with heavyweight interfacing because I am a sewer and had these items readily available. You could jus as easily use paper or card stock.
Step 4.
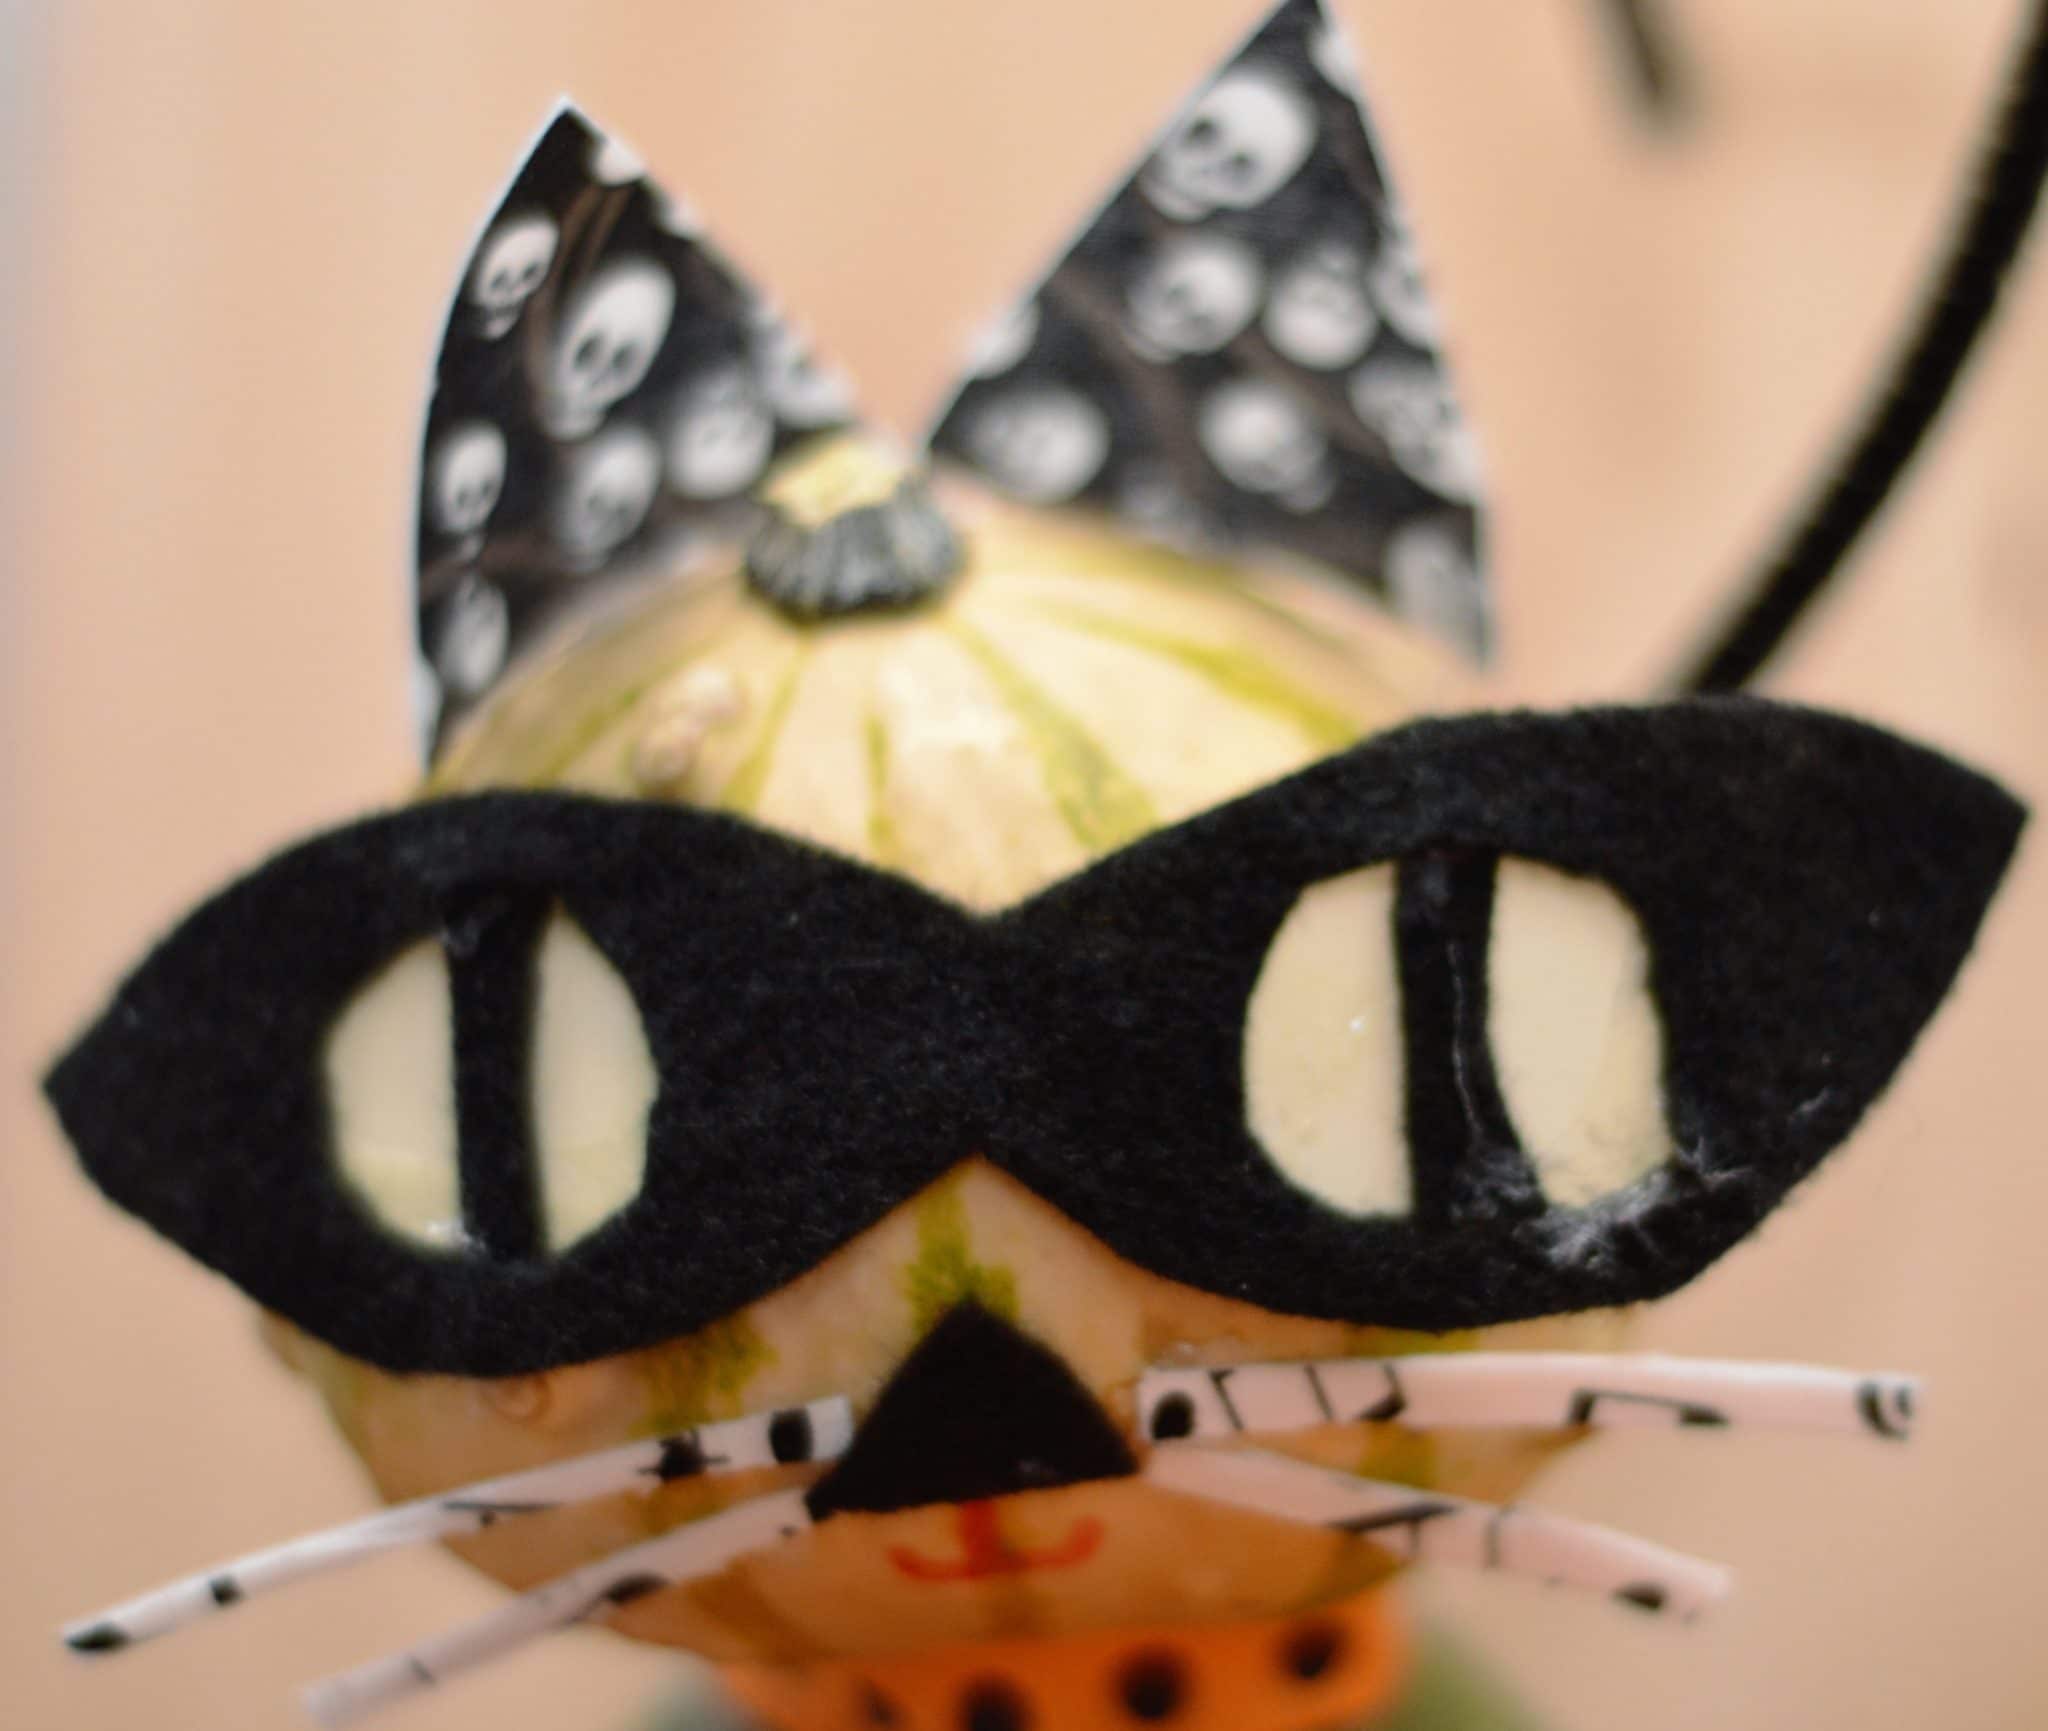
I started with the white pumpkin. I cut out the cat eyes out of black felt then cut out a circle in the middle using the large googly eyes as a pattern. 

I then placed some pale yellow paper behind the holes and a felt line down the middle to mimic t’s eyes. I glued the ensemble onto the white pumpkin. I then used some black and white skull fabric backed with interfacing as the ears and glued them to the back of the cat head. I cut the cat’s nose from black felt and glued it just below the eyes.  I drew the cat’s mouth with a red sharpie. Then I cut some this strips of white and black interfaced fabric to use as whiskers and glued them next to the nose. At this point the cat’s face is complete.

Step 5.
I took the black pipe cleaner and attached it to the bottom of the green pumpkin so that it curls up and the back of the pumpkin. I then glued the head of the cat to the green pumpkin. I let the glue dry then added an orange and black piece of ribbon to serve as the cat’s collar. I then sat the cat on the cupcake spider holder but with the legs facing forward to imitate the legs of the cat. Now you have a finished wide-eyed Halloween Cat.

Step 6.
To go along with the Halloween Cat, there must be a Halloween mouse. TO make the mouse, I first cut out the pieces for the mouse’s face at Pumpkin Faces. Again, I used interfaced fabric but you can use paper or card stock. I cut out the pieces for the face. 

I then created the mouse’s ears by placing the black skull fabric inside the orange fabric and gluing them together.  I attached the ears on the side of the mini pumpkin and the mask on the front. I used craft glue to adhere them to the pumpkin. I then added small googly eyes to the mask. I then cut this strips of interfaced white and black fabric for the whiskers and a small square nose out of felt. Attached them with craft glue. I used a small piece of white felt to act as the mouse’s teeth. I then added the orange pipe cleaner to the back of the pumpkin to serve as the mouse’s tail. After all of these items were glued together, I had the perfect Halloween mouse.
 Step 8.

I had one pumpkin left so I decided to do something a little different. I turned this mini pumpkin into a creepy bloodshot eyeball. This one was super simple. I simply painted to pumpkin with white craft paint. I glued a blue fabric colored button to give it some dimension but you could use paper or felt with a black felt circle in the middle to the painted pumpkin. I then took the end of a small paint brush and dipped it into some red craft paint and squiggled it down the outside of the pumpkin to simulate a bloodshot eye. This is super creepy and super simple. 


