How to Make a Flat Bottomed Zippered Pouch
I was asked to do a tutorial on how to make a flat bottomed zippered pouch. This is one of the easiest beginner sewing projects there is and you can do it in 6 easy steps. The hardest part is deciding on the size. With this pattern you can make the pouch any size you want. Beginners might be intimidated by inserting the zipper but this tutorial provides step by step instructions on how to do it in a breeze.
As usual I went to my stash of remnants and found some fun fabrics to use but if you don’t have remnants or you want to make the bag larger you can always head to Fabric.com Hobby Lobby
This is a beginner sewing project that should take about one hour to complete. I would recommend a woven fabric like quilting cotton or novelty fabric for this project. This zippered pouch can be made in 6 easy steps by anyone with beginning sewing skills. If you would like a video tutorial of this project head over to YouTube and check out my video. While you are there subscribe to my free YouTube channel
What you will Need:
Pattern Remnant or larger outer fabric
Remnant or larger lining fabric
Pellon 808 12″ Zipper or larger depending on size of pouch
Standard sewing supplies
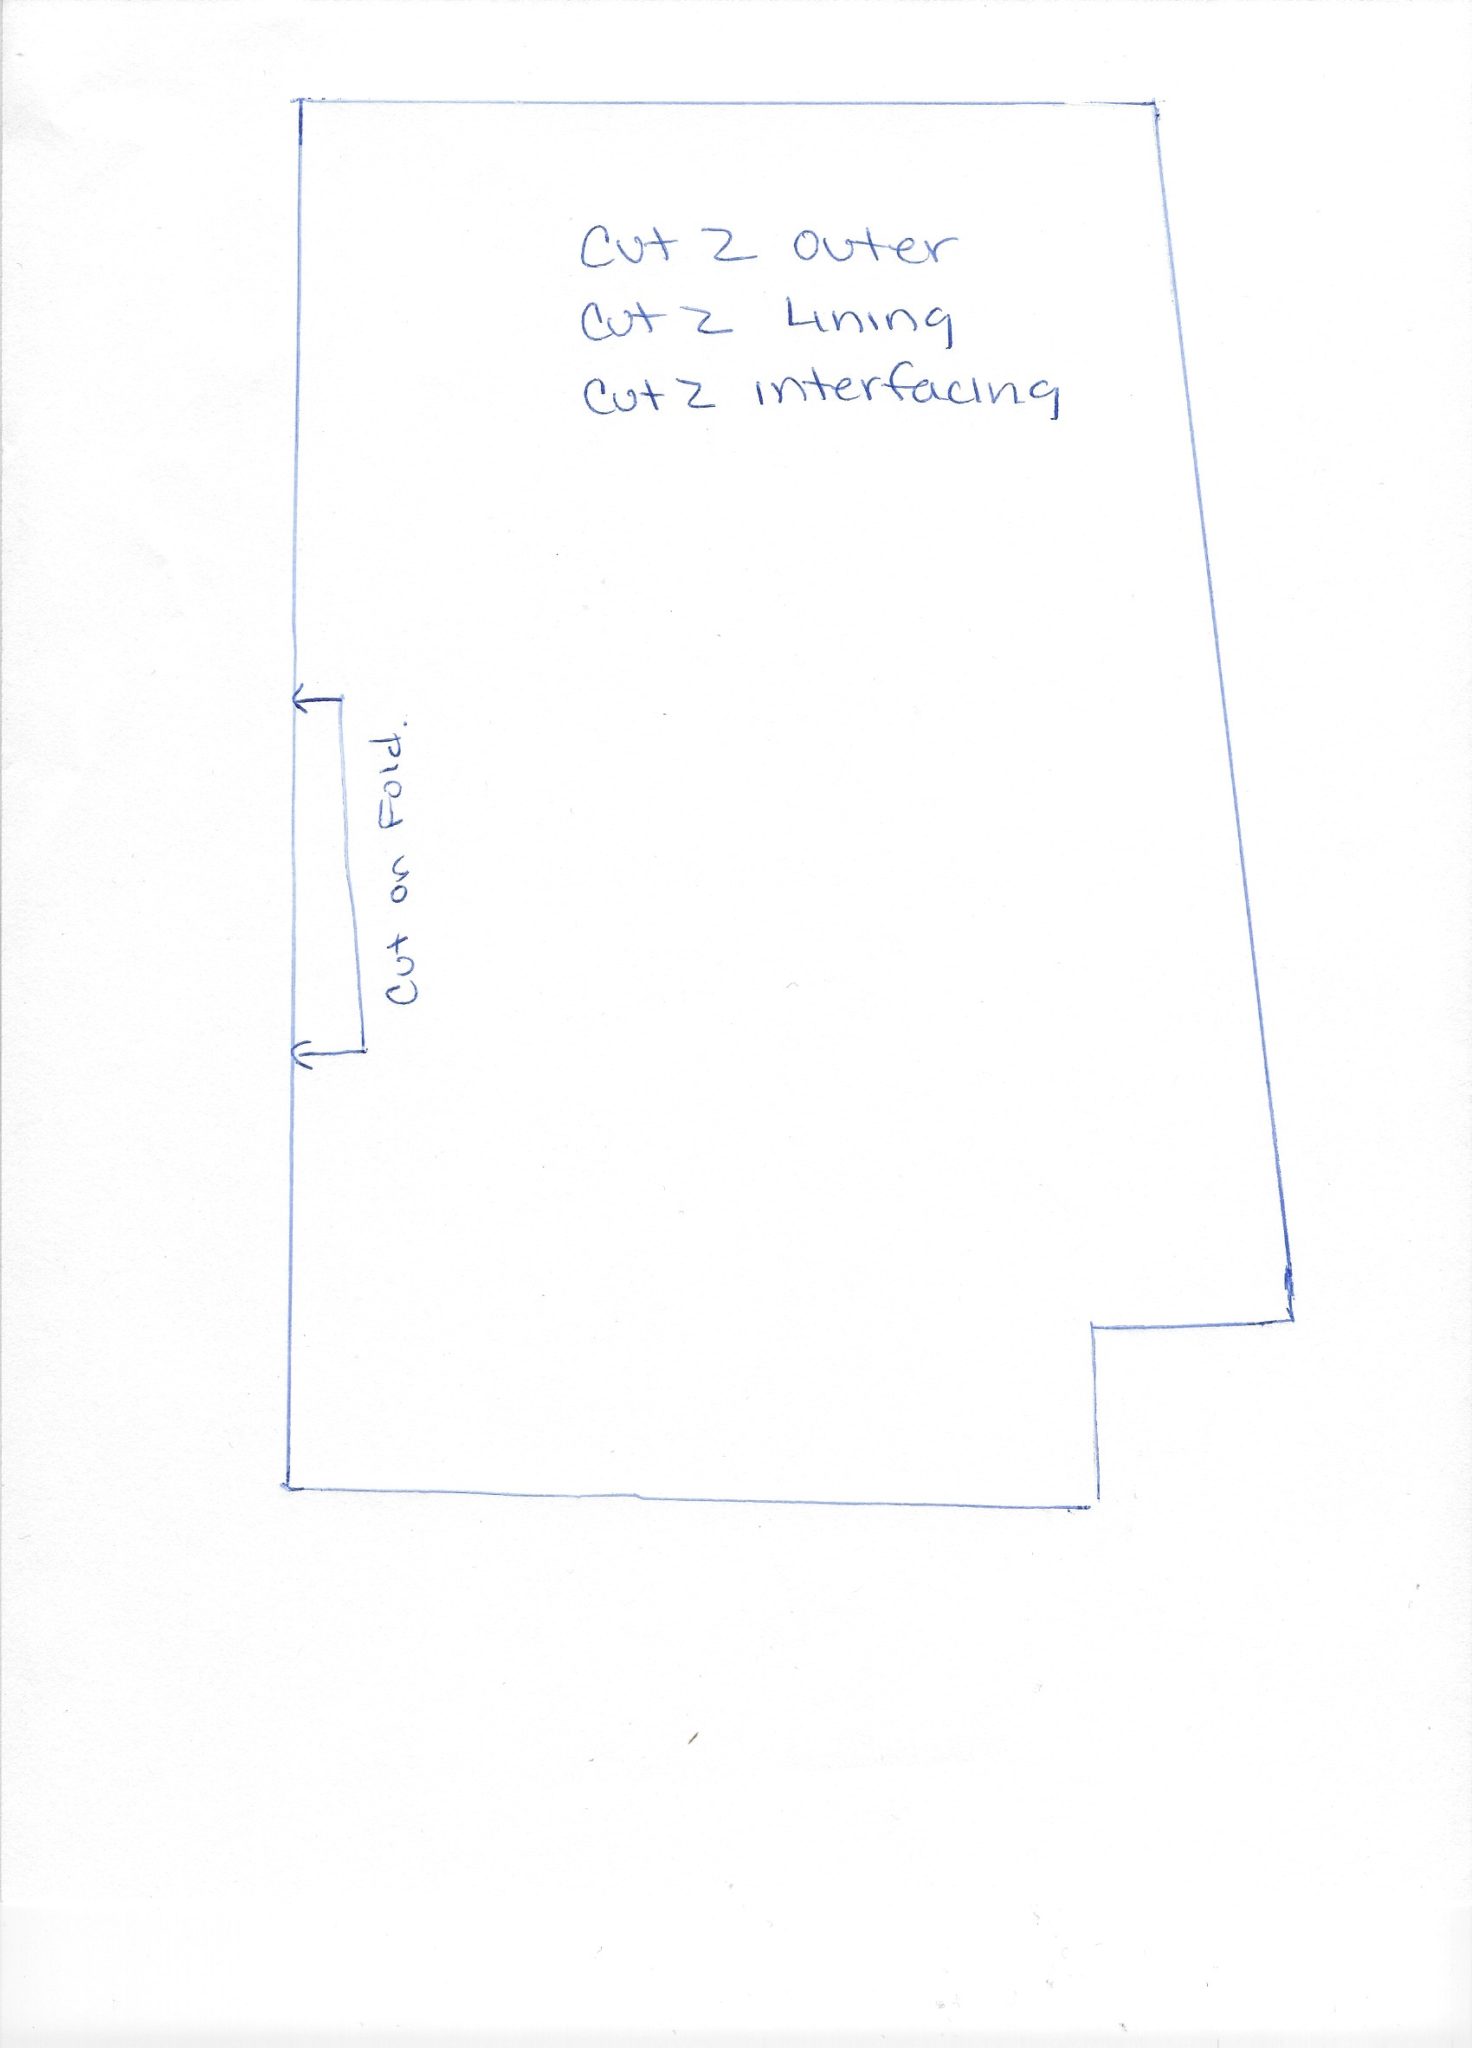
What you will Need: Zippered Pouch Step 1: How to Make a Flat Bottomed Zippered Pouch Create the pattern. You can use the pattern that I have included or use it as a template for a larger or smaller pouch. The pattern includes a 1/4″ seam allowance and results in a finished bag that measures 9″ wide, 5 1/2″ tall, and 3″ deep. From this pattern cut out two of the outer fabric, two of the lining fabric and 2 of the interfacing.
If you are unfamiliar with interfacing it is a product that is used in garments and bags to provide additional structure. It is definitely needed for this project. The interfacing generally comes with instructions on how to apply it and it is a simple process. One side of the interfacing has heat activated glue. Place the glue side onto the wrong side of your fabric and press with a hot iron. The iron will activate the glue and it will fuse to the fabric so that you can work with the two pieces as one.
Step 2: Fuse the Interfacing Fuse the interfacing to the wrong side of the outer fabric.
Step 3: Add the Zipper Lay one piece of the outer fabric right side up on your table. Place the zipper face down and centered on the top edge of the pouch lining up the edges. The zipper will be longer than the fabric. Place the lining fabric on top of that. Pin. Using a zipper foot sew the zipper sandwich near the zipper teeth. Repeat for the other side of the zipper with the remaining outer and lining pieces.
Create a Zipper Sandwich Step 4: Stitch the Sides Unzip the zipper about half way. This is an important step or you will not be able to turn the bag. Place the right sides of the outer fabric together and the right sides of the lining fabric together. Using a 1/4″ seam allowance sew up both sides of the bag sewing over the zipper being careful not to break your needle. Sew the bottom of the outer fabric leaving the corners open. Sew the bottom of the lining fabric so that there is an opening at the bottom and the corners.
Pin the Bag Step 5: Box the Corners Box the corners by pinching the bottom to the side matching the bottom seam to the side seam. Pin. Do this for all four corners. Lay flat and sew across each corner using a 1/2″ seam allowance.
Box the Corners Step 6: Turn the Bag Turn the bag through the opening in the lining and the zipper. Sew the opening in the lining bottom closed using ladder stitch. Push the lining into the outer bag and zip. You have now completed your flat bottomed zippered pouch.
This pouch is perfect as a makeup bag or if you make it larger a nice little clutch. I love the shape of this bag and the ease of construction. Making a zipper bag is easy with this step by step tutorial. I hope you enjoy this beginner sewing project.
If you would like more sewing and crafting projects sign up for our newsletter and receive your free ebook of 15 handbag patterns and tutorials.
<yoastmark class=’yoast-text-mark’>&<yoastmark class=’yoast-text-mark’>amp;</yoastmark></yoastmark><yoastmark class=’yoast-text-mark’>amp;</yoastmark><yoastmark class=’yoast-text-mark’>amp;</yoastmark><yoastmark class=’yoast-text-mark’>amp;</yoastmark><yoastmark class=’yoast-text-mark’>amp;</yoastmark><yoastmark class=’yoast-text-mark’>amp;</yoastmark><yoastmark class=’yoast-text-mark’>amp;</yoastmark>lt;span class=”mceItemHidden” data-mce-bogus=”1″<yoastmark class=’yoast-text-mark’>&<yoastmark class=’yoast-text-mark’>amp;</yoastmark></yoastmark><yoastmark class=’yoast-text-mark’>amp;</yoastmark><yoastmark class=’yoast-text-mark’>amp;</yoastmark><yoastmark class=’yoast-text-mark’>amp;</yoastmark><yoastmark class=’yoast-text-mark’>amp;</yoastmark><yoastmark class=’yoast-text-mark’>amp;</yoastmark><yoastmark class=’yoast-text-mark’>amp;</yoastmark>gt;<yoastmark class=’yoast-text-mark’>&<yoastmark class=’yoast-text-mark’>amp;</yoastmark></yoastmark><yoastmark class=’yoast-text-mark’>amp;</yoastmark><yoastmark class=’yoast-text-mark’>amp;</yoastmark><yoastmark class=’yoast-text-mark’>amp;</yoastmark><yoastmark class=’yoast-text-mark’>amp;</yoastmark><yoastmark class=’yoast-text-mark’>amp;</yoastmark><yoastmark class=’yoast-text-mark’>amp;</yoastmark>lt;span<yoastmark class=’yoast-text-mark’>&<yoastmark class=’yoast-text-mark’>amp;</yoastmark></yoastmark><yoastmark class=’yoast-text-mark’>amp;</yoastmark><yoastmark class=’yoast-text-mark’>amp;</yoastmark><yoastmark class=’yoast-text-mark’>amp;</yoastmark><yoastmark class=’yoast-text-mark’>amp;</yoastmark><yoastmark class=’yoast-text-mark’>amp;</yoastmark><yoastmark class=’yoast-text-mark’>amp;</yoastmark>gt;<yoastmark class=’yoast-text-mark’>&<yoastmark class=’yoast-text-mark’>amp;</yoastmark></yoastmark><yoastmark class=’yoast-text-mark’>amp;</yoastmark><yoastmark class=’yoast-text-mark’>amp;</yoastmark><yoastmark class=’yoast-text-mark’>amp;</yoastmark><yoastmark class=’yoast-text-mark’>amp;</yoastmark><yoastmark class=’yoast-text-mark’>amp;</yoastmark><yoastmark class=’yoast-text-mark’>amp;</yoastmark>lt;/span<yoastmark class=’yoast-text-mark’>&<yoastmark class=’yoast-text-mark’>amp;</yoastmark></yoastmark><yoastmark class=’yoast-text-mark’>amp;</yoastmark><yoastmark class=’yoast-text-mark’>amp;</yoastmark><yoastmark class=’yoast-text-mark’>amp;</yoastmark><yoastmark class=’yoast-text-mark’>amp;</yoastmark><yoastmark class=’yoast-text-mark’>amp;</yoastmark><yoastmark class=’yoast-text-mark’>amp;</yoastmark>gt;<yoastmark class=’yoast-text-mark’>&<yoastmark class=’yoast-text-mark’>amp;</yoastmark></yoastmark><yoastmark class=’yoast-text-mark’>amp;</yoastmark><yoastmark class=’yoast-text-mark’>amp;</yoastmark><yoastmark class=’yoast-text-mark’>amp;</yoastmark><yoastmark class=’yoast-text-mark’>amp;</yoastmark><yoastmark class=’yoast-text-mark’>amp;</yoastmark><yoastmark class=’yoast-text-mark’>amp;</yoastmark>lt;span class=”mceItemHidden” data-mce-bogus=”1″<yoastmark class=’yoast-text-mark’>&<yoastmark class=’yoast-text-mark’>amp;</yoastmark></yoastmark><yoastmark class=’yoast-text-mark’>amp;</yoastmark><yoastmark class=’yoast-text-mark’>amp;</yoastmark><yoastmark class=’yoast-text-mark’>amp;</yoastmark><yoastmark class=’yoast-text-mark’>amp;</yoastmark><yoastmark class=’yoast-text-mark’>amp;</yoastmark><yoastmark class=’yoast-text-mark’>amp;</yoastmark>gt;<yoastmark class=’yoast-text-mark’>&<yoastmark class=’yoast-text-mark’>amp;</yoastmark></yoastmark><yoastmark class=’yoast-text-mark’>amp;</yoastmark><yoastmark class=’yoast-text-mark’>amp;</yoastmark><yoastmark class=’yoast-text-mark’>amp;</yoastmark><yoastmark class=’yoast-text-mark’>amp;</yoastmark><yoastmark class=’yoast-text-mark’>amp;</yoastmark><yoastmark class=’yoast-text-mark’>amp;</yoastmark>lt;span<yoastmark class=’yoast-text-mark’>&<yoastmark class=’yoast-text-mark’>amp;</yoastmark></yoastmark><yoastmark class=’yoast-text-mark’>amp;</yoastmark><yoastmark class=’yoast-text-mark’>amp;</yoastmark><yoastmark class=’yoast-text-mark’>amp;</yoastmark><yoastmark class=’yoast-text-mark’>amp;</yoastmark><yoastmark class=’yoast-text-mark’>amp;</yoastmark><yoastmark class=’yoast-text-mark’>amp;</yoastmark>gt;<yoastmark class=’yoast-text-mark’>&<yoastmark class=’yoast-text-mark’>amp;</yoastmark></yoastmark><yoastmark class=’yoast-text-mark’>amp;</yoastmark><yoastmark class=’yoast-text-mark’>amp;</yoastmark><yoastmark class=’yoast-text-mark’>amp;</yoastmark><yoastmark class=’yoast-text-mark’>amp;</yoastmark><yoastmark class=’yoast-text-mark’>amp;</yoastmark><yoastmark class=’yoast-text-mark’>amp;</yoastmark>lt;/span<yoastmark class=’yoast-text-mark’>&<yoastmark class=’yoast-text-mark’>amp;</yoastmark></yoastmark><yoastmark class=’yoast-text-mark’>amp;</yoastmark><yoastmark class=’yoast-text-mark’>amp;</yoastmark><yoastmark class=’yoast-text-mark’>amp;</yoastmark><yoastmark class=’yoast-text-mark’>amp;</yoastmark><yoastmark class=’yoast-text-mark’>amp;</yoastmark><yoastmark class=’yoast-text-mark’>amp;</yoastmark>gt;<yoastmark class=’yoast-text-mark’>&<yoastmark class=’yoast-text-mark’>amp;</yoastmark></yoastmark><yoastmark class=’yoast-text-mark’>amp;</yoastmark><yoastmark class=’yoast-text-mark’>amp;</yoastmark><yoastmark class=’yoast-text-mark’>amp;</yoastmark><yoastmark class=’yoast-text-mark’>amp;</yoastmark><yoastmark class=’yoast-text-mark’>amp;</yoastmark><yoastmark class=’yoast-text-mark’>amp;</yoastmark>lt;/p<yoastmark class=’yoast-text-mark’>&<yoastmark class=’yoast-text-mark’>amp;</yoastmark></yoastmark><yoastmark class=’yoast-text-mark’>amp;</yoastmark><yoastmark class=’yoast-text-mark’>amp;</yoastmark><yoastmark class=’yoast-text-mark’>amp;</yoastmark><yoastmark class=’yoast-text-mark’>amp;</yoastmark><yoastmark class=’yoast-text-mark’>amp;</yoastmark><yoastmark class=’yoast-text-mark’>amp;</yoastmark>gt;
Like this: Like Loading...
Related


Thanks for the quick and easy instructions! I like this better than the flat ones!
Your welcome. Thanks for trying it out. I am glad you enjoyed it.