How to Make a Full Circle Skirt
How to Make a Full Circle Skirt

I wear a lot of skirts to work and thought I would make my own full circle skirt that I could wear with a suit jacket. It was a far easier process than I thought. In fact it was one of the easiest garment making projects that there is. I do not make a lot garments here at Sew Very Crafty because I like to focus on simple sewing and crafting projects for the beginner and intermediate sewist. This project fits right in. Anyone can draft this pattern and sew this skirt. All you have to do is follow the step by step instructions and you will learn how to make a full circle skirt in no time.
I created a pattern for this project on medical exam room paper. You know, the type they put on the little beds at the doctor’s office. But you can actually draft this pattern on wrapping paper or directly on your fabric if it is not as busy as the fabric I chose and you can see your markings. I chose a light weight knit fabric for my skirt since I live in California but you could choose something heavier if you like. For this pattern I think that a knit is better but you could use a woven fabric. Just keep in mind that there will be no stretch in the woven fabric and you will have to account for that.
I purchased this outrageously busy fabric at JOANN Fabric & Craft Stores because it matches my college school colors and March Madness is coming up and I wanted to fly my colors proudly. You can always head over to Hobby Lobby or Fabric.com to get exactly what you need for your circle skirt project. This post contains affiliate links that if you click on them I may receive a small commission at no extra cost to you. As an Amazon Associate I earn from qualifying purchases.
What You Will Need: How t Make a Full Circle Skirt
- Pattern making paper (Optional)
- 2-21/2 yds of fabric
- 2″ wide elastic
- Standard sewing supplies
Step 1: Take your measurements
You will be taking three measurements, waist, hips and length.
Step 2: draft the pattern
In order to make the pattern take the hip measurement and add 1″ then divide that number by 6.28 in order to get the skirt’s radius. Then add 2″ to the length for seam allowance.
Take your drafting paper and place your measuring tape on the corner. Measure down to the radius number and draw a curve from one side to the other. You will now have a quarter circle in the corner of your paper. Next, measure from the corner to length number and draw another quarter circle. I ended up adding a bit more paper to the side of my pattern piece because it wasn’t quite wide enough but you may not have to do that. Cut out the pattern.


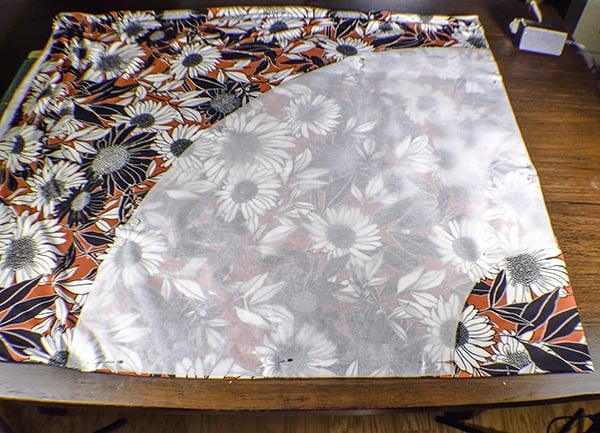
Step 3: Cut your Skirt Fabric
Your fabric will come folded wrong sides together. Keep it folded then fold it in half so that it is now in quarters. There should be folds on the top and one side of the fabric. Place the pattern piece in the corner where the folded edge is. The sides of the pattern should match with the both folded sides. Cut along the radius and the hem. You should have a large circle with a hole in it. This is your skirt.


Step 4: Cut your Waistband
Cut a piece of fabric to measure your hip measurement plus 1″ for seam allowance and 6″ wide.

Step 5: Create your waistband
Stitch the short ends of your waistband right sides together using a 1/2″ seam allowance to create a complete circle. Pin the waistband to the top of your skirt right sides together. Stitch the waistband to the skirt using a 1/2″ seam allowance. Fold over the raw edge of the waistband by 1/4″ and pin it to the wrong side of the top of the skirt along the seam. Stitch along the folded edge using a coordinating thread. Leave a 3″ opening so insert the elastic.
Cut a piece of elastic that equals your waist measurement or a few inches smaller. I would try this out. I ended up using elastic about 4″ shorter than my waist measurement for a more comfortable fit. Using a safety pin feed the elastic through the channel in the waistband. Join the two ends of the elastic by overlapping them. Using a zig zag stitch sew the two ends together. Let the elastic slip into the channel. Sew the opening closed either by hand or with your machine.


Step 6: hem your skirt
Hem your skirt by folding up the raw edge by 1/2″ then again by 1/2″ and pin. Sew along the folded edge using a small zig zag stitch if you are using a knit fabric. You want to use zig zag stitch because it will stretch with the fabric. If you are using a woven fabric you can use a straight stitch. You could also use a twin needle to hem your knit fabrics if you like. Check out my tutorial on how to use a twin needle here. You have now completed your easy to make circle skirt.


I hope you enjoyed this project. If you would like more simple sewing and crafting projects sign up for our newsletter and recess access to our free printables library.
If you would like some simple sewing videos subscribe to our YouTube channel Free by clicking on the link