
How to Make a Scan n Cut Dust Cover
 How to Make a Scan n Cut Dust Cover
Anyone that follows this blog knows that I purchased a Brother Scan n Cut years ago on a whim from a home shopping program and am just now learning how to use it. I pulled it out from a bunch of dust to give it a go for a few previous posts. Now I have decided to create a cover for my scan n cut so it doesn’t get dusty again. I am going to show you exactly how I did it. My Scan n Cut came in handy in the process. The Scan n cut does more than just cut. It adds seam allowances too. How convenient is that? You see the scan n cut draws too.
If you do not have a scan n cut but have a Curcut or Silhouette this process will work just as easily. I used decorator weight fabric for this project because I had it on hand but you don’t really need to use that. You could use quilting cotton if you like.I purchased this fun Hawaiian print at JOANN Fabric & Craft Stores but you could head over to Hobby Lobby or Fabric.com to get what you need for this project. This post contains affiliate links that if you click on them and make a purchase I may receive a small commission at no extra cost to you. As an Amazon Associate I earn from qualifying purchases.
What you will need: How to make a Scan n Cut dust cover
- Pattern you can get by clicking on this link
- 1/2 yd fabric
- Heat Transfer Vinyl (Optional)
- Brother Scan N Cut
- Standard sewing supplies
Step 1: Create your Pattern
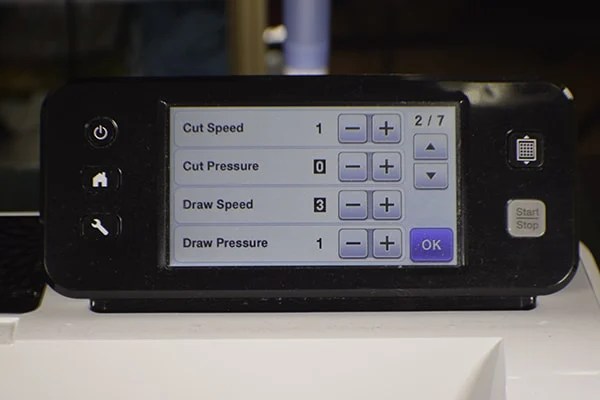
Create the ends of your dust cover. I turned my Scan n cut on its end and traced around the ends to create an initial template. But, I needed to add a seam allowance to this initial template. I knew that I wanted to use a 1/4 ” seam allowance but I did not want the dust cover to be too snug so I decided on about 3/8″ . In order to add the seam allowance I took the easy way. I scanned my hand drawn template into my scan n cut. I went to the screen on the scan n cut and pressed the wrench icon.
Step 2: Create your Pattern
Once I clicked on the wrench I saw a menu that allowed me to scroll to the draw pressure and speed. The draw pressure was set at 1 and the speed at 3. I clicked ok and was sent to a screen that gave me the option to create an out line. The circle within a circle icon. Set if for .31 which is close to 3/8″ seam allowance. I clicked OK twice and was given the option to cut or draw. I chose to draw and the Scan n Cut created the seam allowance around my original template. You do not need to do this step because I have included the pattern for you but thought you would like to know how I did it.

Step 3: Cut out your fabric
Cut two of the template fabrics making sure they are mirror images of each other using the pattern link above. This generally happens automatically when you are cutting two pieces of fabric that are folded. But in case you are cutting the pieces one at a time turn the template over to cut one of the pieces. Cut one piece of fabric that measures 21″ wide by 17 1/2″ long.
Step 4: Pin the Fabrics
Lay the large piece of fabric on your work surface right sides up. Place the template pieces right sides together on each end and on the bottom and pin.

Step 5: Pin the Fabrics
Fold the top corner down to the corner of the template piece and pin along the edges to create the cap ends of the dust cover. Repeat for the other side.

Step 6: Stitch the Ends
Stitch both cap ends to the main fabric pieces using a 1/4″ seam allowance. Sew a narrow hem all the way around the bottom of the dust cover.
Step 7: decorate
Decorate your dust cover to your taste. Use Iron on vinyl or applique made from your scan n cut to create a fun design. I added some Heat Transfer Vinyl to spruce up my scan n cut dust cover. If you would like to know how this process works follow my tutorial here.


I hope you enjoyed this project. If you would like more sewing and crafting projects sign up for our newsletter and receive access to our free printables library.


Great project and much needed. Thanks for your instructions.
You’re welcome. I desperately needed it as well.
bought my svan n c on a whim too and havent got to grips with it as yet and its gathering dust so this project is just great and as we are stuck in lockdown right now im going to give it a go today. Thank you for the tutorial, much appreciated, Best Wishes from Telford UK
apologies for the typos
Good luck with the project. I am not in total lockdown like you guys are. My husband is from England so I keep abreast of what happens over there. But nothing is open here and it feels like it so I hope you enjoy the project. I really needed it and it has come in handy. Stay safe from here in California.
Hi, having just found this lovely site, I will be able to do something useful and fun, thus stopping me going stir crazy ???
Please could you tell me where to find the pattern you mentioned providing; I don’t have the strength to support the ScanNCut on end and I’d hate to drop my precious toy.
Stay safe and take care, God Bless x
Thank you. The pattern for the ends is here. https://sewverycrafty.com/wp-content/uploads/2019/05/Dust-Cover-Pattern-2.pdf. Please let me know if you need anything else. Thanks for trying the project.
May I ask what model you have as to if its the same as mine?
I have the older model cm350. I hope this helps.