
How to Sew a Drawstring Easter Bunny Bag
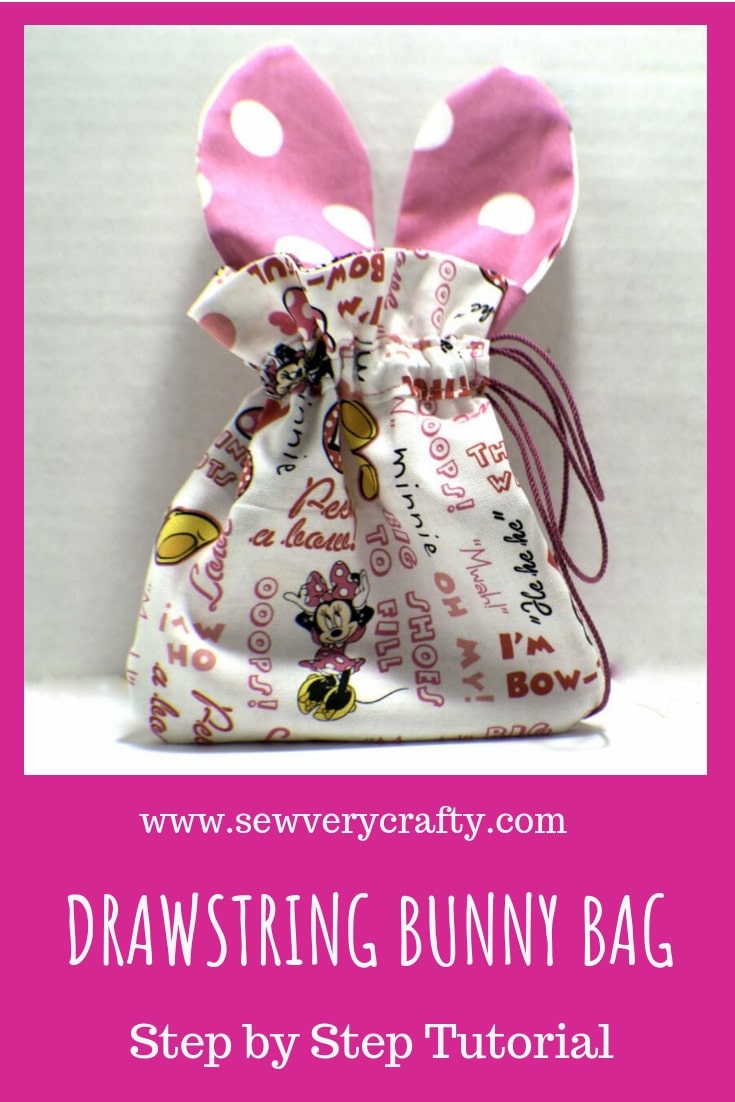

It is almost Easter and I thought about creating this fun Easter Bunny Drawstring bag for little treats to little tykes. These bags are super simple to make and take about 1/2 hour to complete. As usual I delved into my remnant stash for this project but if you want to find the perfect fabric for you head over to Fabric.com or Hobby Lobby to get exactly what you need.
This pattern was created by Ashley Johnson for Bernina. If you like Bernina products you can get what you need at Sewing Machines Plus. They have a wide range of Bernina machines and accessories.
Now on to How to Sew a Drawstring Easter Bunny Bag. This post contains affiliate links that if you click on them and make a purchase I may receive a small commission at no extra charge to you.
This is a beginner sewing project that should take about an hour to complete. I would recommend that you use a woven fabric like quilting cotton or novelty fabric for this project. If you would like to watch a video tutorial of this project head over to YouTube and check out my video. While you are there, subscribe to our free YouTube channel.

What you will Need:
- Fabric for bag and outer ears (a woven cotton works best)
- Contrasting fabric for inner ears (a woven cotton works best)
- 1/4 inch ribbon or rope for drawstring
- Standard sewing supplies
- Free Bunny Sewing Pattern
Step 1: How to Sew a Drawstring Easter Bunny Bag
Cut out your free bunny sewing pattern as follows: Cut out 2 body pieces from the outer fabric and 2 body pieces from the lining fabric. Cut 2 ear pieces from the outer fabric and 2 from the lining fabric. In addition, cut 2 rectangle pieces that measure 6 1/2″ x 1 1/2″ that coordinate with the outer pieces to use as a ribbon guide.

Step 2: How to Sew a Drawstring Easter Bunny Bag
With right sides together and using a 1/4″ seam allowance sew each of the ear pieces together leaving the short end open for turning. Turn so the ears are right sides out. Press.

Step 3: How to Sew a Drawstring Easter Bunny Bag
Place one of your main bag pieces right side up. Lay the 2 finished ears on top with the contrasting fabric facing down. Place the 2 ears 3/8 inch apart, lining up the raw edges of the ears with the upper straight edge of the main bag piece. Sew the ears to the main bag piece using a 1/4 inch seam allowance.

Step 4: How to Sew a Drawstring Easter Bunny Bag
Lay a lining piece on top of the main bag piece with the ears and sew across the top using a 1/2″ seam allowance. Sew the remaining two main body and lining pieces together at the straight edges. Fold over so that the pieces are right sides out and press. You should now have two body pieces with one having ears attached.

Step 5: How to Sew a Drawstring Easter Bunny Bag
Take the two rectangular pieces and fold the long edges toward the center and press. Fold the short edges over 3/8″ and press. Sew down the short edges.

Step 6: How to Sew a Drawstring Easter Bunny Bag
Place the rectangles on the right side of the main body pieces and sew along the long edges using a 1/8″ seam allowance. Leave the ends open for your cording or ribbon.

Step 7: How to Sew a Drawstring Easter Bunny Bag
With right sides together sew the two bag pieces together along the sides and bottom. Turn right side out.

Step 8: How to Sew a Drawstring Easter Bunny Bag
Thread your ribbon or cording through the ribbon guides using a bodkin or a safety pin. You have now finished your Drawstring Easter Bunny bag. Fill with treats and pull the drawstring closed for a fun little surprise.


If you would like more sewing and crafting projects sign up for my newsletter and receive your free ebook of 15 handbag patterns and tutorials.

Cute and simple! Thanks.
You’re welcome.