How to Make A Drawstring Tote Bag
Tote bags are fun and functional and I just love this simple drawstring tote bag pattern. It is so simple to make that I just had to share it with you. It is perfect for those everyday items or to travel with or even the beach. You can use water resistant fabrics or use some Pellon Vinyl fuse to coat any fabric you like in vinyl to make it water resistant. I love this product. Water resistant fabric is limited in patterns and this product really solves that problem. I urge you to give this product a try if you want to make a wet bag for the beach or pool.
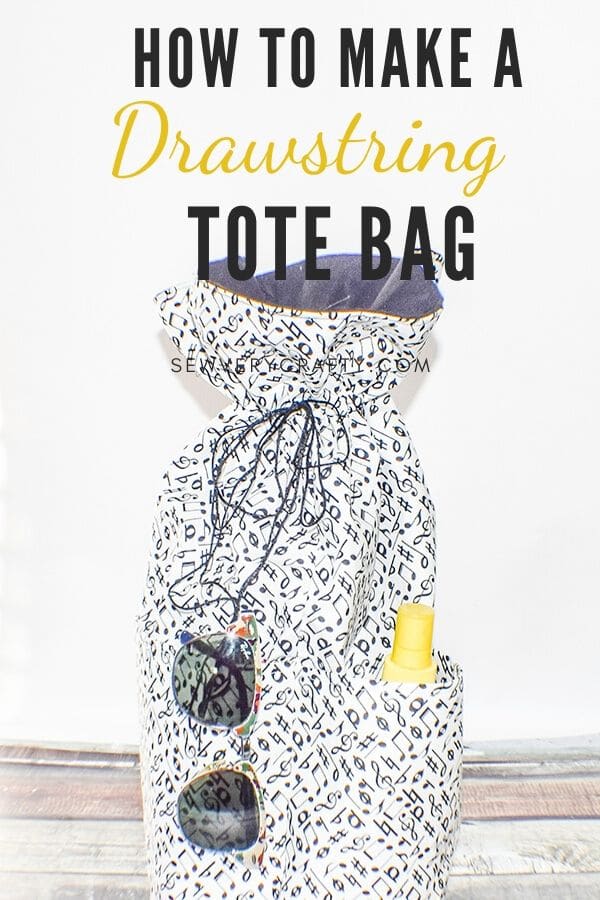
I chose a black and white musical themed fabric that I got on sale with a coupon at JOANN Fabric & Craft Stores![]() but you could go to Hobby Lobby or Fabric.com to get exactly what you need for this project. There are so many fabrics to choose from that I chose a quilting weight fabric but you could avoid adding interfacing by choosing a utility weight fabric or a home decorator weight fabric for this project. This post contains affiliate links that if you click on them and make a purchase I may receive a small commission at no extra cost to you. As an Amazon Associate I earn from qualifying purchases.
but you could go to Hobby Lobby or Fabric.com to get exactly what you need for this project. There are so many fabrics to choose from that I chose a quilting weight fabric but you could avoid adding interfacing by choosing a utility weight fabric or a home decorator weight fabric for this project. This post contains affiliate links that if you click on them and make a purchase I may receive a small commission at no extra cost to you. As an Amazon Associate I earn from qualifying purchases.
What you will Need: How to make a drawstring tote bag
- Pattern you can get here
- 3/4 yd outer fabric
- 1/2 yd lining fabric
- 1 yd 1/2″ cable cord
- 1/2 yd Pellon 808
- standard sewing supplies
Step 1: Cut your Fabrics
Cut one outer piece, lining piece and interfacing that measures 17″x 24-1/2″. Cut one 8″ circle from outer fabric, lining fabric, and interfacing for the bottom. The 8″ circle is the pattern piece above. For the outer pockets cut one outer piece and interfacing 14″ x 24 1/2″.

Step 2: Create the pockets
Fold the the outer pocket piece lengthwise and press. Topstitch along the fold. Lay the pocket piece right sides up on the outer bag piece matching the sides and bottom. Baste along the sides and bottom using a 1/8″ seam allowance. Divide the pocket piece into fourths and draw lines. I used Frixion heat erasable pens to draw my lines. You can get them in my Amazon Shop. Stitch along those lines from top to bottom to create the outer pockets.


Step 3: Sew the seam
With right sides together stitch the short sides of the bag together using a 1/4″ seam allowance. Start at the top and stitch 3 1/4″ back stitch. Skip 3/4″ then stitch to the bottom. Press the seam open. The opening you left in the seam will be used for the draw string. Stitch a square around the opening you left in the seam for strength and to prevent the fabric from stretching. Turn right sides out.

Step 4: Add the bottom
With right sides together stitch the outer circle to the bag as shown.

Step 5: Create the Lining
Create lining by sewing the short edges right sides together leaving an opening for turning. Stitch the lining circle onto the bottom of the lining piece right sides together.
Step 6: Add the lining to the outer bag
Place the outer bag into the lining bag so that they are right sides together. Stitch along the top of the bag using a 1/4″ seam allowance. Turn the bag right sides out through the opening you left in the lining. Close the opening closed using ladder stitch. Top stitch around the top of the bag for a more professional look.

Step 7: Create the casing
Draw a line 3″ down from the top all the way around the bag. Draw another line 3 3/4″ down from the top. Stitch along those lines through both the outer fabric and the lining. Insert the cording through the hole and knot the ends. You have now finished your drawstring tote bag.

I hope you enjoyed this project. If you would like more sewing and crafting projects sign up for our newsletter and receive your free eBook of 15 handbag patterns and tutorials.