How to Sew Bias Binding
Many of you may have questions on how to sew bias binding. It seems daunting at first but really isn't once you know how. This brief tutorial seeks to show you just how easy it is to sew bias binding to your latest project. Bias binding is made by cutting strips of fabric at a 45-degree angle also called the bias. The purpose of cutting the strips on the bias is because woven fabric stretches more when cut on a 45 degree angle and can more easily be eased around corners. The strips are then used to finish raw edges. You can purchase bias binding or you can make your own following my make your own bias binding tutorial. If you make your own you have control over the size of the binding but if you purchase it you will be limited. The most common type of bias binding for small projects and garments is the extra wide double fold bias tape.
Step 1: How to Sew Bias Binding
It is important to note that the back side of purchased bias tape is wider than the front so that it is easier to catch the back when sewing from the front. To begin, we are going to start on the back side of our project. The reason we do this is so that we have nice neat stitching on the front side where we can see as we sew.

Step 2: How to Sew Bias Binding
Once your project is placed back (wrong) side facing up, find the wide side of the tape and attach to the raw edge of the backside of your project and clip. You can pin but I find that wonder clips work better for this application.

Step 3: How to Sew Bias Binding
Leaving a tail of about three inches, sew along the first crease of the tape, following the crease line as closely as possible all around your project. If you are sewing around a curve, ease the tape around the curve without pulling. It should ease into the curve naturally because of the bias cut. If you are sewing around corners, you will want to create crisp miters.

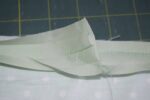
As you are stitching on the first crease and are approaching a corner stop about 1/2″ from the end and back stitch to secure. Remove your work from the machine and line up the raw edge of the binding with the raw edge of the next side. Fold the tape so that it is perpendicular to the stitched edge and clip on the folded edge and on the raw edge of the next side.


Start sewing along the raw edge from the top of your project until you get to the next corner where you will repeat the same process.This process will continue until you are ready to join the binding.
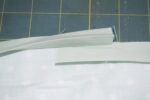
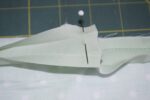
How to Join the Ends of the Binding
Remember that you left a 3″ tail at the beginning of your work. Overlap that tail with the ends of your bias tape by 1 3/4″ or the total width of your opened binding whichever is larger. Most purchased extra wide bias binding will be 1 3/4″. Cut the binding to this length. Next, place the open ends right side together. You will create a small square. Sew diagonally across the square. Cut off the excess and you have a perfectly joined bias end. Continue sewing on the first crease until you are finished.

Step 4: How to Sew Bias Binding
Once the bias tape has been sewn on the first crease, turn your project to the front (right) side. Wrap the bias tape over the raw edge and clip. If you have thick layers, you may have to trim the seam allowance so that the bias tap fits around the edges without puckering. At this point, the front edge of the bias tape should cover your previous stitching and enclose all layers of the raw edges of your project. You may have to pull it a little to ensure full coverage of those previous stitches.
Step 5: How to Sew Bias Binding
Sew as close as you can to the front edge of the bias tape while still catching the back of the binding. Because you are now sewing from the front you should be able to see your stitches clearly. Here is where the smaller crease on the front edge is important. Sewing close to the front edge should enable you to catch the bottom of the wider bottom bias tape. You have now completed your bias binding project.

If you would like more sewing and crafting tutorials sign up for our newsletter and receive your free list of sewing room must haves.