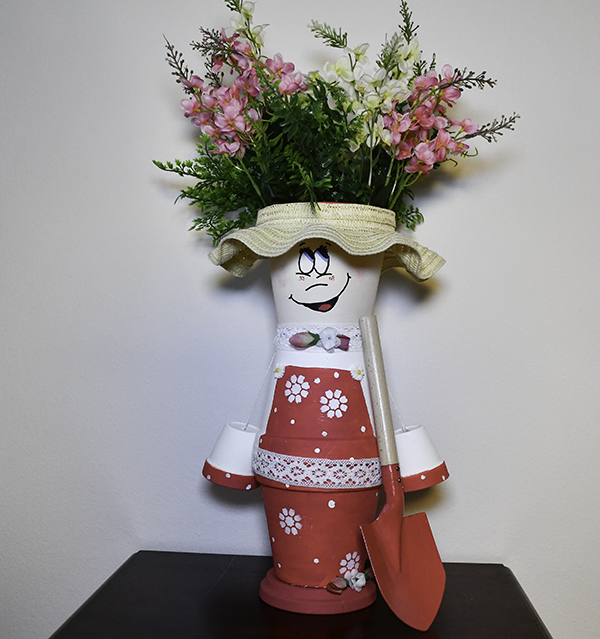
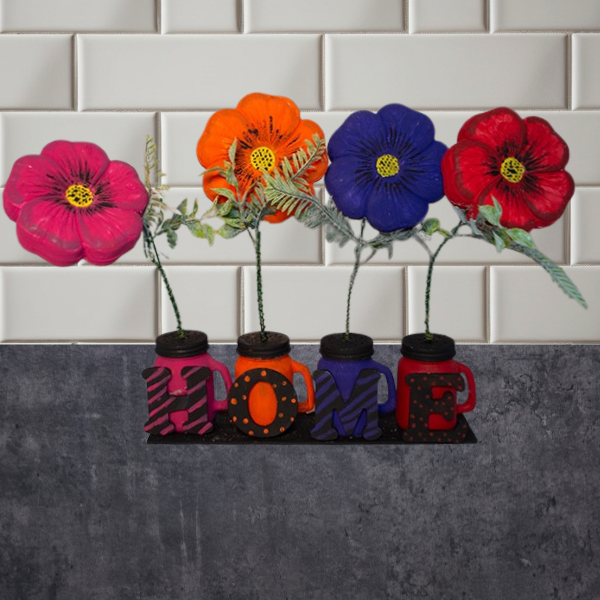
I love spring and summer flowers. I saw these resin flower shapes at Dollar Tree and decided to make some summer home decor using them and so I came up with this idea. Color is the name of the game here so I hope you like it as much as I do. These flowers reminded me of pansies so I used pansy colors for my flowers. If you like this project and want more Dollar Tree projects check out my Dollar Tree page for many more.
Note: This post contains affiliate links that if you click on them and make a purchase I will receive a small commission at no extra cost to you. As an Amazon Associate I earn from qualifying purchases.
What you will Need: How to Make Dollar Tree Flower Home Decor
- 4 Dollar Tree Resin shapes
- 16 or stronger gauge floral wire
- 4 Dollar Tree salt shaker jars with handles
- Thin floral wire
- Pink paint
- Orange paint
- Purple paint
- Red Paint
- Yellow Paint
- Black Paint
- Dollar Tree Greenery
- 2.5″ letters from Michael's
- 1 Dollar Tree board
- 2 packages of rocks
- Spackle
- Awl
- Hot glue
Step 1: Paint the Flowers
Paint each resin flower a different color. I used acrylic paint for nice bright colors. I used red, orange, purple and pink paints for the main part of the flowers. Paint the center yellow. Once the paint has dried embellish the center using black paint. I painted dots in the center and thin lines radiating out from the centers. Paint both sides.


Step 2: Paint the Salt Shaker Jars
Paint the four salt shaker jars in the same colors as the resin flowers. I needed several coats for this process. Let dry completely.


Step 3: Paint the Salt Shaker Tops
Paint the tops of the salt shakers black. I used black chalk paint for this as it covers well. Let dry completely.


Step 4: Prepare the Board
Remove the jute hanger and tag from the board. Add spackle to the holes on both sides. Let dry. Sand the excess off the board. Paint the board using black chalk paint.


Step 5: Add the Floral Wire
Using an awl or drill create a hole in each of the sides of the flower shapes in between the petals. You will find that the shapes are hollow. Place a dab of hot glue in the hole and insert one of the 16 gauge wire pieces all the way inside the hole.


Step 6: Add the Greenery
I took some greenery and simply pulled four double leafed pieces from my bundle. Insert the wire through the hole in the pieces. Add a touch of hot glue to secure. Add a second piece of thick wire and wrap it with the thin wire so that the wire is taught but can still bend.

Step 7: Add the Stones
Add the Dollar Tree stones into each of the shakers to create wait for the flowers. I filled the shakers to the top with just enough room to insert the wire. Put the top onto the shaker.

Step 8: Glue the Shakers to the Board
Hot Glue the bottom of the shakers to the board.
Step 9: Insert the Wire into the Shaker..
There are a number of holes in the shaker top. There is one right in the center. Using the awl enlarge the center a bit so that the bottom of the wire pieces will fit in the center hole. Insert the wire with the flowers and the greenery into the center hole of the shaker top and through the rocks.
Step 10: Paint the Letters
Paint the letters with black chalk paint. Once the chalk paint drys embellish the letters. I used the colors of the flowers to add polka dots and stripes. Hot glue the letters to the fronts of the shakers. Once the letters are added you have finished your Dollar Tree flower home decor.


I hope you enjoyed this simple Dollar tree Craft. If you would like more sewing and crafting projects subscribe to our free sewing and crafting projects subscribe to our free newsletter and receive your for Holiday Dollar Tree eBook.
If you would like video tutorials of some of Sew Very Crafty's most popular posts subscribe to our free YouTube channel here.

Join our Sew Very Crafty Fans Facebook group
If you want to ask questions and share your projects join our Facebook group here. The community will help to achieve your sewing and crafting dreams.