
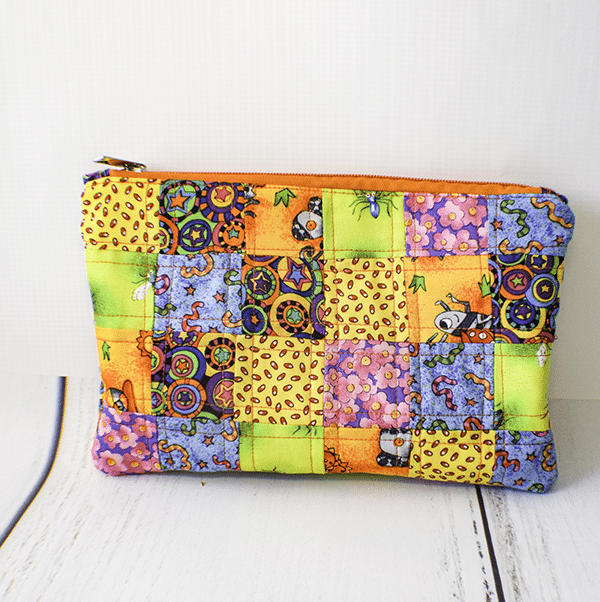
Boxy Zippered Pouch

Here is a terrific boxy zippered pouch or dopp kit tutorial that can be used for many different purposes. You can turn it into a dopp kit pouch for men's shaving gear or other items by changing up the fabric or using faux leather. This pouch is great for travel too. It is super easy to make. You just need basic sewing skills for this project so lets get started. If you need fabric for this project head over to Fabric.com or Hobby Lobby to pick up the perfect fabric for your boxy zippered pouch. This post contains affiliate links that if you click on them and make a purchase I may receive a small commission at no extra charge to you. If you would like a two zippered and two compartment version of this same project check out my double zipper box pouch tutorial.
What you will Need:
– 12″ zipper
– 2 exterior panels 13″ x 8″
– 2 lining panels 13″ x 8″
– 2 panels of fusible interfacing 13″ x 8″
– 4″ x 7″ scrap of fabric for handle
Step 1: Boxy Zippered Pouch
Cut your fabric panels to the above measurements and fuse the exterior panels with the fusible interfacing. I used Pellon 808 for a firmer boxy feel.
Step 2: Boxy Zippered Pouch
With right side up, lay down one of your exterior panels. Center the zipper face down on the exterior panel and layer one of your lining pieces on top with right sides down. You should now have a zipper sandwich with the exterior and lining pieces right sides together.
Step 3: Boxy Zippered Pouch
Sew the zipper to the two panels of fabric using a zipper foot starting and ending 1/2″ from each end. Repeat the process for the other side of the zipper. You should now have two pieces of fabric on each side with the zipper in the middle. Top stitch both sides of the zipper.

Step 4: Boxy Zippered Pouch
With right sides together pin the outer panels together along the long end. Do the same for the lining pieces. You should now have two separate pieces.
Step 5: Boxy Zippered Pouch
Sew the exterior panels together along the long edge. Then sew the lining panels together leaving an opening for turning in the center of the long edge.

Step 6: Boxy Zippered Pouch
Fold both sides so that the seams are aligned with the zipper and press them open. Sew all four short edges separately.

Step 7: Boxy Zippered Pouch
Measure and mark 1 1/2″ squares on edge side of the short edges and cut out the squares.

Step 8: Boxy Zippered Pouch
Make the handle using the 4″ x 7″ piece of fabric by folding the piece in half long ways. Press. Open the fold and fold the raw edges toward the center and press. Fold in half again. Top stitch both sides of the handle.

Step 9: Boxy Zippered Pouch
Insert the handle through the square openings of one end of the bag.

Step 10: Boxy Zippered Pouch
Box all four of the corners including the handle pieces and sew across the edges. Make sure that the zipper is open before closing up the corners.

Step 11: Boxy Zippered Pouch
Turn the bag through the opening you left in the lining bottom and push the lining into the bag. Close the opening in the lining using ladder stitch and you have finished your boxy zippered pouch.

If you would like more bag tutorials sign up for my newsletter and get my free ebook of 15 handbag patterns and tutorials.


Are the seems showing on the inside ?
No the seams do not show on the inside of this pouch. Everything is encased in the lining. Thanks for asking. Let me know if you have any additional questions.
What are the finished dimensions?
I believe it is 8 1/2 x 5 1/2 x 3 or right around that. It has been a long time since I made this.