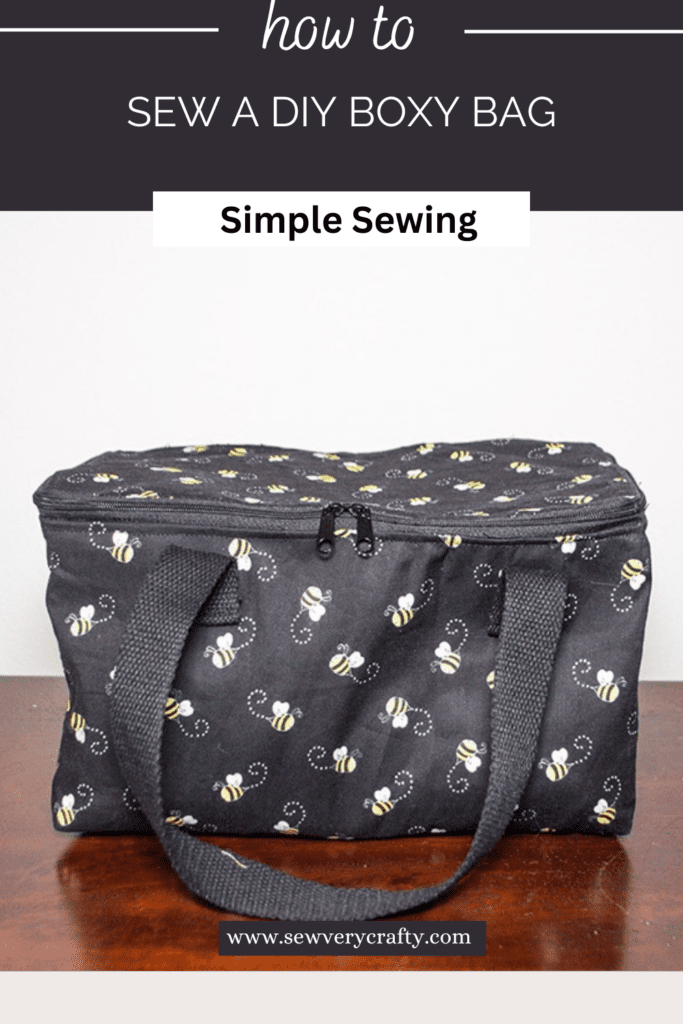
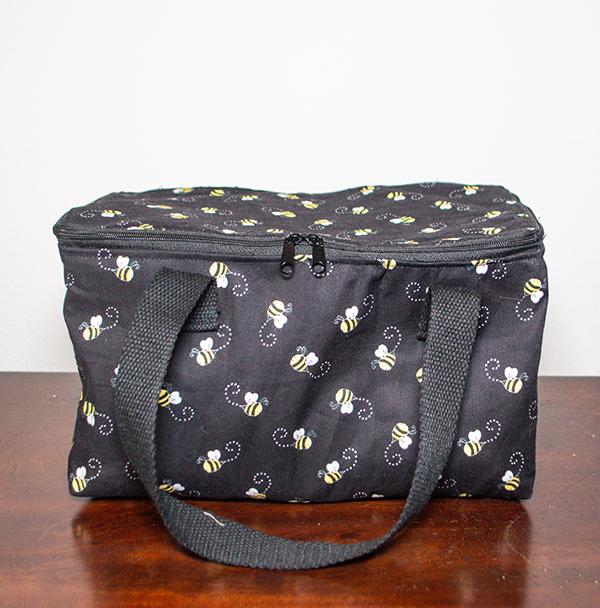
I love it when I come across fun and functional sewing projects. at Bernina designed this fun to make DIY boxy bag to store and carry a variety of things. This is a nice little storage bag. I modified it just a bit to accommodate the fabrics I wanted to use. Using different fabrics lets my personality shine. Add some insult-bright and turn it into a lunch box. I hope you like this boxy bag as much as I do. For more bag making projects head over to my handbag page.
Note: This post contains affiliate links that if you click on them and make a purchase I will receive a small commission at no extra cost to you. As an Amazon Associate I earn from qualifying purchases.
What you will Need: How to Make a DIY Boxy Bag
- 1 yard outer and lining fabric
- 1/2 yard Pellon 808 Interfacing
- 30″ continuous zipper
- 2 zipper sliders
- Webbing for the handles
- Standard Sewing supplies

Step 1: Cut the Fabrics
For the body:
- 2 x outer pieces 16 1/2″ x 9 1/2″ outer
- 2 x lining pieces 16 1/2″ x 9 1/2″ lining
- 2 x Pellon 808: 2 x 15 3/4″ x 5 1/2″ and 2 x 9 1/2″ x 3 1/8″
- 4 x pieces for the inner pockets 8 3/8″ x 5 1/2″ lining
For the lid
- 1 x 10 1/2″ x 6 1/2″ outer
- 1 x 10 1/2″ x 6 1/2″ lining
- 2 x Pellon 808: 2 x 10 1/2″ x 6 1/2″
Zipper tabs:
- 1 x outer fabric 3 1/8″ x 1 3/8″
- 1 x 3 1/8″ x 1 3/8″ lining fabric
For the handles:
- 2 x 19 3/8″ x 1″ webbing

All seam allowances are 3/8“
Step 1: Fuse the Interfacing
There are two sizes of Interfacing. Fuse it to the wrong sides of the corresponding outer and lining fabric pieces using a hot iron and following the manufacturer's instructions. Fuse the smaller pieces on either side of the outer and lining body pieces with the large piece in the center. If you are using leather or faux leather you will not need to add the interfacing to the outer body.

Step 2: Prepare the Handles
Take the webbing pieces and fold under the raw edges 1/2″ and topstitch each of the four ends to prevent fraying.

Step 3: Prepare the Outer Body
Draw a 3 1/8″ square on each of the bottom corners to the outer body pieces. Cut out the squares. Draw a dashed line on the wrong side of the outer piece from the corner of the cut out to the top of the bag. Do this for each side. Then, draw solid lines adjacent to the dotted lines toward the center of the bag 3/8″ away to represent the seam allowance. Draw solid lines 3/8″ from each raw edge as well. Do this for both outer bag body pieces.


Step 4: Add the Handles
Measure in 1 3/8″ from both of the solid vertical lines that are toward the center of the bag and make a mark. Measure down 2 1/8″ and make a mark. Place the handles so that the ends are at the 2 1/8″ mark and are 1 3/8″ in from the solid line. Topstitch a square on the bottom of each handle to secure.

Step 5: Create the Outer Bag
Place the outer bag pieces right sides together. Stitch the pieces together along the bottom. Press the seam open and topstitch along each side of the seam. Stitch the sides leaving the cut outs unstitched. Press the seams open and stitch the seams allowance down on each side.


Step 6: Box the Corners
With right sides together pinch the bottom and the sides together closing up the openings in the bottom. Make sure the seams are in line. Stitch across the straight line you created and stitch using a 3/8″ seam allowance. Turn right sides out and press.

Step 7: Create the Zipper Ring
Thread the zipper sliders onto the zipper. The sliders should be facing in opposite directions. Place the outer zipper tab right sides together with the zipper at each short end. Stitch using a 3/8″ seam allowance. Turn right sides out and topstitch along the seams.


Step 8: Add the Zipper to the Top
Start with the outer top piece. Find the centers of each side by folding the top in half lengthwise and making a mark and then folding the top widthwise and making a mark. Repeat for the zipper. Place the mark you made on the zipper tab right sides together with a mark you made on one of the long sides of the top. Clip using wonder clips. Repeat this process for each side matching the marks as you go. Once all for marks have been clipped continue to clip until the zipper is securely attached to the top. Make small snips around the corners of the zipper to help ease the zipper into place. Stitch the zipper into place.


Take the lining zipper tab and fold the short ends under and press. Place the lining zipper tab wrong sides together with the outer tab. Stitch the short ends to secure. Place the lining fabric right sides together onto the outer top on top of the zipper. Clip in the same way you did for the outer fabric. Make sure the zipper is between the layers and the zipper to be stitched to the body is out of the way. Stitch through all layers following the previous stitch line but leave an opening for turning. Trim the corners. Turn right sides out and press. Topstitch making sure that the opening is closed as you go.

Step 9: Add the Top to the Outer Body
Add the other side of the zipper to the body making sure that you have created the marks on four sides and matched them to the marks on the zipper. Clip in the same way you did for the top. Stitch all the way around to secure the zipper.


Step 10: Fuse the Interfacing to the Lining
Fuse the interfacing to the lining in the same way you did for the outer body. The purpose of separate interfacing pieces is to create a fold to allow the bag to stand easier.

Step 11: Prepare the Inner Pockets
Take two of the pocket pieces and place them right sides together. Stitch all the way around leaving an opening for turning. Turn right sides out and press. Repeat for the second two pieces. Topstitch along one long edge. Fold the pieces in half widthwise to find the center and press to create a crease.


Step 12: Add the Pockets
Place one pocket piece onto the lining in the center 1 1/8″ from the top. Stitch down the center Then around the sides and the bottom making sure to close the opening as you go. Repeat for the second pocket.

Step 13: Create the Lining
Stitch the two lining pieces right sides. together in the same way you stitched the outer bag. This time leave an opening for turning on the bottom. You do not need to topstitch the the seams.


Step 14: Join the Outer and Lining Bags
Place the outer bag inside the lining bag so that they are right sides. together. Clip all the way around making sure to line up the seams and that all the marks are lined up. Stitch all the way around following the previous stitch line. Turn the bag right sides out through the opening in the lining and the zipper. Push the lining into the outer bag and topstitch around the zipper. Once that is finished so are you. You have finished your DIY boxy bag.


I hope you enjoyed this bag making project. if you would like more sewing and crafting projects subscribe to our free newsletter and receive your free handbag eBook.
Join our Sew Very Crafty Fans Facebook group
If you want to ask questions and share your projects join our Facebook group here. The community will help to achieve your sewing and crafting dreams.

Subscribe to our Free YouTube Channel!