I have been wanting to make one of these for a while but just never got around to it. This grocery bag holder is a beginner sewing project that anyone can make. You can make this project with fabrics that match your own home's decor. You can make this project really easy by using a pant leg as the base of your grocery bag. I didn't have any pants to cut up for this project so I used cotton fabric for mine. I am in a summer bee mode so I wanted a bee theme for this one. I hope you like this project.
Note: This post contains affiliate links that if you click on them and make a purchase I will receive a small commission at no extra cost to you. As an Amazon Associate I earn from qualifying purchases.
What you will Need: How to Make a Grocery Bag Holder
- Bee pattern you can get by clicking on this link
- 1 pant leg or a piece of fabric that measured 18″ x 21″
- 2 pieces of 1/4″ elastic that measure 8
- Scrap piece of contrasting fabric
- Scrap of yellow fabric
- Yellow felt
- Black Felt
- White felt
- Black, light blue and yellow embroidery thread

Step 1: Cut out the fabrics
From your main fabric cut a piece that measures 18″ x 21″. Cut a piece an accent piece that measures 10″ x 18″. Cut another piece of your main fabric that measures 4″ x 6″. Using the pattern, cut out the felt pieces. Cut 11 strips of various yellow fabrics about 1 3/8″ wide x 7″ long.
Step 2: Prepare the accent fabric
Fold both long edges under 1/4″ and press.


Step 3: Add the accent fabric
Find the lengthwise center of the accent piece and the widthwise center of the main fabric piece to find the centers. Match the centers. Stitch the accent piece to the main fabric piece along the long folded edges.

Step 4: Stitch the Hanger
Take the 4″ x 6″ piece of main fabric and fold the long raw edges to the center and press. Fold in half lengthwise to enclose the raw edges and press. Stitch on both sides.


Step 5: Add the Hanger
You will have two casings for this project. Place the hanger so that one short end is right sides together with the top of the main fabric 1 1/2″ from the long raw edges. Place the other end of the hanger on the other side of the main fabric in the same way. Stitch the hanger to the main fabric vertically 1/2″ from the raw edge.

Step 6: Create the Casings
To make the casings fold the main fabric raw edges under 1/2″ and stitch around the bottom leaving room for the elastic.

Step 7: Add the Elastic
Insert a safety pin to the end of the elastic piece. Push the elastic through the casing making sure that you do not pull it all the way through. Stitch each end of the elastic to secure it. Repeat for the other casing. Fold up the handle and stitch along the sides to secure


Step 8: Create the Bee Hive
Start by taking two strips of fabric and place them right sides together. Stitch along the long edges using a 1/4″ seam allowance. Repeat this process until all nine pieces have been stitched. Using the pattern piece, Cut out a hive shape from the stitched strips. Then, cut out a piece of fabric using the hive pattern. Place the pieced hive shape right sides together with the plain hive shape. Stitch all the way around using a 1/4″ seam allowance. Leave an opening for turning. Turn right sides out and press


Step 9: Add the Bee Hive to the Grocery Bag Holder
Stitch the hive to the bag along the sides and bottom making sure the opening is closed. Leave the top open like a pocket.

Step 10: Create the Bees
These bees are very easy to make. Take one of the yellow bee bodies And add the large round circles to the top and stitch. Then add the black circles to the white circles and Stitch. I hand stitched the black eyes. Next, stitch the stripes onto the body. Hand stitch the mouth using an embroidery back stitch. Stitch the outer edge of the bee wings using a running stitch to embellish the wings.
Place the second body piece together with the first. Place the wings and the antenna in between the two body pieces Stitch around the top of the bee. Lightly stuff the bee through the open bottom. Stitch the bottom closed. The Bee is complete. Repeat for a second Bee.


Step11: Add the Bees
Stitch the bees to the front of the grocery bag.

Step 13: Stitch the Holder together

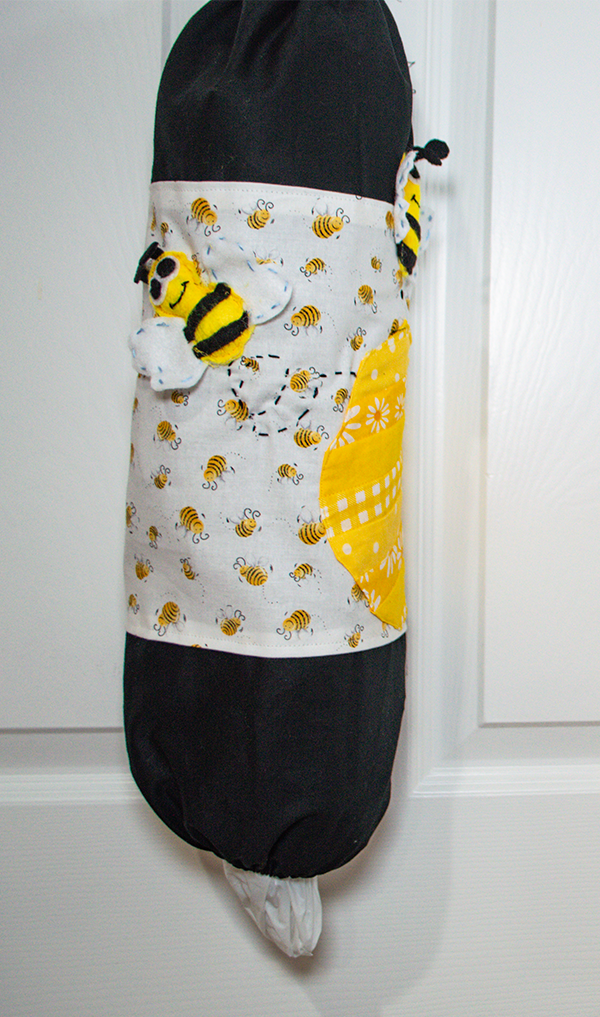
Take the ribbon and create a bow. Stitch the bow to the top of the grocery bag holder. Fill the grocery bag holder with bags, hang and enjoy
I hope you enjoyed this simple sewing project. For more sewing and crafting projects subscribe to our free Newsletter and receive access to our free printables library.