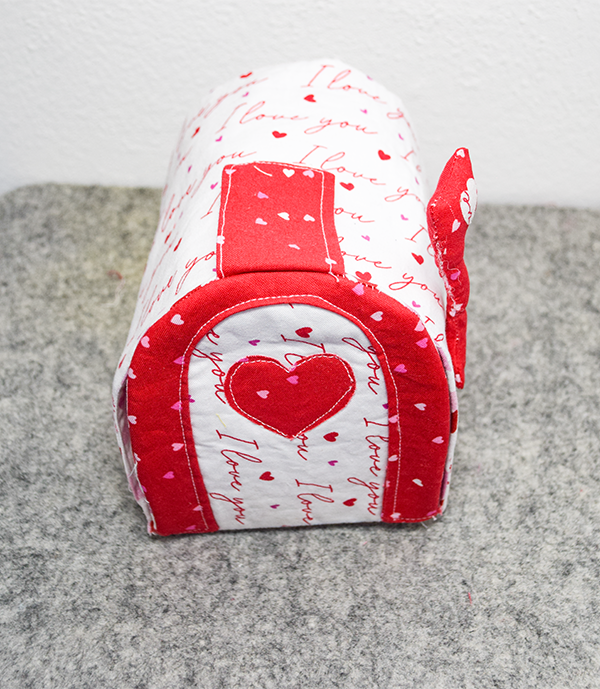
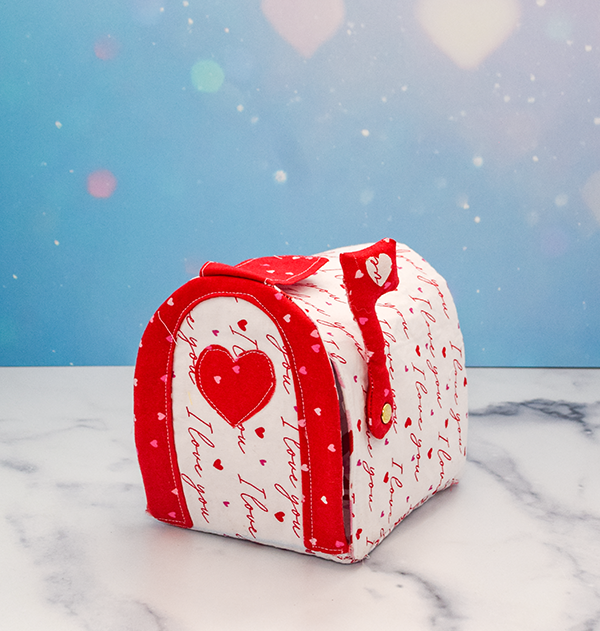
Valentine's Day is always fun, especially for kids. I remember exchanging Valentine's Day cards as a child. That inspired me to create this cute mailbox for children to receive their Valentine's Day cards. This is a very easy sewing project that comes out just adorably for the child in your life. I had Valentine's fabrics on hand that I used for this project and I must admit that it was pretty fun. I hope you will find it fun too. If you would like more holiday sewing projects head over to my Holiday Project Vault for many more.
Note: This post contains affiliate links that if you click on them and make a purchase I will receive a small commission at no extra cost to you. As an Amazon Associate I earn from qualifying purchases.
What you will Need: How to Sew a Valentine's Day Mailbox
- Pattern you can get by clicking on this link
- 1/2 yd of main outer fabric
- 1/2 yd lining fabric
- 1/4 yd solid fabric
- Scrap of Wonder Under
- 1/4 yd double sided fusible fleece
- 1/4 yd Pellon 808
- 1 piece of Velcro
- Small amount of fiberfill
- Scrap of Valentine's fabric
- Sewing Machine
- Standard Sewing supplies
Step 1: Cut the Fabrics
Tape the pattern together. Using the pattern cut piece A and B using the main Valentine's fabric, lining fabric, 808 and fusible fleece. Cut two of piece C and two of piece D. From the scrap fabric cut one small heart. Cut the Large heart from the solid fabric. Finally, cut small squares of the Wonder Under. Cut two tab pieces E from the Solid fabric.


Step 2: Create the Applique
Take the squares of fabric and fuse the Wonder Under onto the wrong side. Draw the heart shapes onto the paper backing. Cut out the heart shapes. Fuse the larger of the two hearts on the right side of one end of Piece A. This end will be the front flap of the Mailbox. Stitch the heart using straight, zigzag or blanket stitch. Repeat this process for the smaller heart and place it on the flag piece at the top.


Step 3: Stitch the Flag
Place the two D flag pieces right sides together. Stitch together using a 1/4″ seam allowance leaving an opening for turning and adding the fiberfill. Turn right sides out through the opening. Push the corners out using a poking tool. Fill with a small amount of fiberfill. Stitch the opening closed using ladder stitch.


Step 4: Create the Tab
Add a small piece of Velcro to one end of the tab piece. Place the tab pieces right sides together and stitch along one short end and two long edges. Turn right sides out and press.


Step 5: Fuse the Interfacing
Fuse the Pellon 808 onto pieces A and B using a hot iron and following the manufacturer's instructions. Fuse the fleece on top of the 808 in the same way. .


Step 6: Stitch the Accent Piece
Place the two C pieces right sides together. Stitch the interior arc and the bottoms using a 1/4″ seam allowance. Turn right sides out and press. Place the piece on the end of the main piece A where you placed the heart appliqué and pin. Topstitch around the seams through all layers. Stitch the outer arc using a 1/8″ seam allowance.


Step 7: Add the Velcro Tab
Place the tab piece right sides together with the center of the front of the rectangle with the Velcro facing up and pin. Stitch using a 1/8″ seam allowance.

Step 7: Stitch the Outer Mailbox
Start by drawing the two straight lines across piece A using chalk or an erasible pen. Stitch along those lines. Fold on the lines and press well. Clip the curves of the back curve of Piece A. Place one long raw edge of rectangle piece B right sides together with the back curve of piece A and stitch using a 1/4″ seam allowance. Stitch the bottom sides of the mailbox using a 1/4″ seam allowance. Turn right sides out and press. Add a the other side of the Velcro to the top of the mailbox,


Step 8: Stitch the Lining Mailbox
Create the lining in the same way that you created the outer mailbox.

Step 9: Join the Outer Mailbox to the Lining
Place the outer mailbox right sides together with the lining mailbox. Stitch the two pieces together around the front curve leaving an opening for turning. Turn right sides out and press. Close the opening using ladder stitch or topstitch making sure to close the opening. Hand stitch the lining to the outer mailbox along the curved seam using invisible stitch if needed. I used double sided fusible fleece so I did not need to do this. Stitch across the flap where it meets the mailbox.


Step 10: Add the Flag
I wanted my flag to be able to move so I added a brad. Start by opening a small hole in the location indicated on the pattern. Add another hole through the bottom of the flag as indicated. Insert the brad through the flag and again through the mailbox. Fold the back of the brad open on the inside of the mailbox. You can cover the inside prongs with a small piece of fabric using wonder under. Once the flag has been added you have finished your Valentine's Day mailbox. Open and close the front of the mailbox using the Velcro tab.


I hope you enjoyed this simple sewing project. If you would like more sewing and crafting projects subscribe to our free Newsletter and receive access to our free printable library.
If you would like video tutorials of some of Sew Very Crafty's most popular posts subscribe to our free YouTube channel here.