Easy Padded Sewing Machine Cover
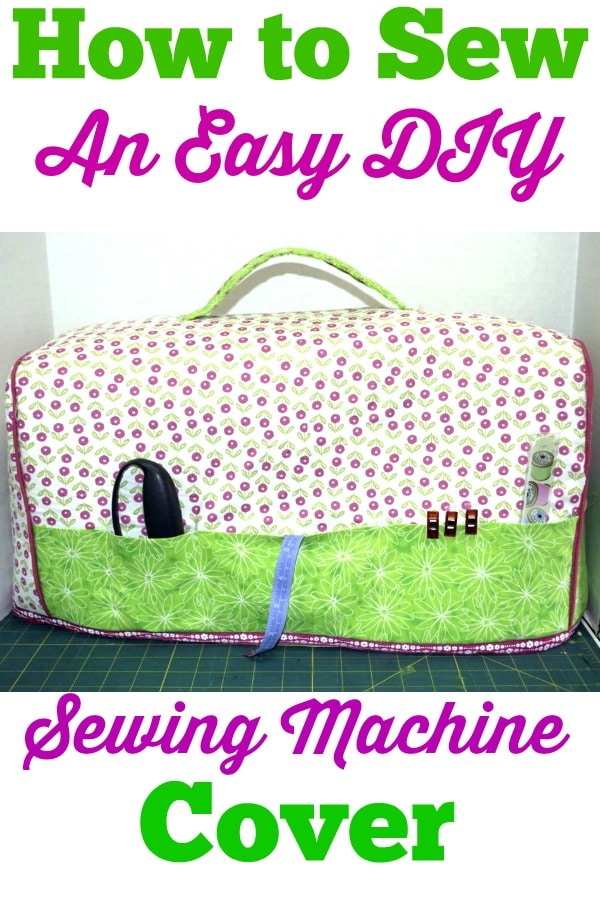
Here is my easy padded sewing machine cover. I thought I would use my bag making skills to create this super simple sewing machine cover that anyone with basic sewing skills can create. There is nothing complicated here. Just measure, cut, create. Embellish this gem anyway you like to make it totally your own.
What you will Need:
- 1 yd exterior fabric
- 1 yd lining fabric
- 1 yd double sided fusible foam
- 1 package pre-made or self-made bias piping
- Ribbon or Bias Tape
- Standard Sewing Supplies

Step 1: Easy Padded Sewing Machine Cover
Measure, Measure, Measure. Start by measuring your machine. Measure the height of your machine from the bottom to the top. Then measure the length and the depth. Finally, measure the main body from the front of the machine to the back going over the top. You will use these measurements to cut out your pattern.
Step 2: Easy Padded Sewing Machine Cover
Cut your fabric as follows:
- Main body: You will cut a piece of fabric that is 1/2″ longer than the main body measurement and 1/2″ wider than the length. For my Viking Opal 690 this measurement is 29 1/2″ x 21″.
- Ends: You will cut a piece of fabric that is the same as your height plus 1 3/4″ and the same as your depth plus 2″. Use a plate or some other circular piece to round the corners of your ends. Keep in mind that your ends must match the main body piece. Take some time to pin the main body piece to the ends to make sure they line up and trim where necessary before proceeding. You can also take some time to check for fit.
- Cut two additional pieces of contrasting fabric to serve as pockets on the front and side of your cover. You can make these pockets as large as you want. I simply cut my fabric to 9 1/2″ x 21″ for the front pocket and 9 1/2″ x 10 1/2″ more or less for the end piece and folded it in half lengthwise. I say more or less for the end piece because my machine is wider on the bottom than it is on the top so I cut my ends to reflect that and the pocket piece mirrors the end piece. I top stitched along the top folded edge for a nice finish and to strengthen the pockets.
- Cut a contrast piece of fabric 7″ x 12″ to serve as the handle for your case.
Step 3: Easy Padded Sewing Machine Cover
Pin the pockets to the side piece and the bottom front of the main body piece. Decide how many sections you would like and sew lines vertically to divide the pockets into sections. I chose to divide my end pocket into three sections and my front pocket into five sections. I then sewed the lines in a matching thread to separate out the sections. You could use a contrasting thread for this part and perhaps add some decorative stitching. I liked my fabric so I wanted it to shine in my cover.

Step 4: Easy Padded Sewing Machine Cover
Fuse the foam to your main body piece and the ends. Be very careful not to fuse the other side to your ironing surface. You can easily fuse one side of the foam to the main body if you take some care.

Step 5: Easy Padded Sewing Machine Cover
Pin the bias piping to the ends of your cover making sure the raw edges are lined up and sew using a piping or zipper foot. You should clip the curves so that the piping will lay nice and flat. With right sides together pin the main body piece to one of the end pieces sandwiching the bias piping and sew through all layers using a 3/8″ seam allowance. Repeat for the other end.

Step 6: Easy Padded Sewing Machine Cover
Create the lining piece by simply sewing the lining end pieces to the lining main body piece. Do not use any foam or piping. I used a 1/2″ seam allowance here to make sure the lining was nice and snug inside my case.
Step 7: Easy Padded Sewing Machine Cover
Place the lining and the exterior of the cover right sides together and sew around the bottom leaving an opening for turning. Turn the cover right side out through the opening just like you would do in a bag.

Step 8: Easy Padded Sewing Machine Cover
Push the lining up into the inside of the cover and press well so that the lining fuses into the other side of the fusible foam and the bottom seam is even. Your cover should be well fused at this point but to firmly secure the lining to the foam and outer fabric add the handle to the top.

Step 9: Easy Padded Sewing Machine Cover
To make the handle take your 7″ x 12″ piece and fold the short ends to the inside by a 1/4″ to cover the raw edges. Then fold it in half lengthwise and press. Fold the sides into the center lengthwise and press again then fold together to make a long piece of fabric folded in four. Topstitch around the handle using either a straight or decorative stitch. I chose a decorative stitch using a contrasting thread. Sew the handle 5 1/2″ from each end through all layers.

Step 10: Easy Padded Sewing Machine Cover
Add some bias tape or ribbon to highlight the bottom of your cover and to close the opening you left for turning. If you choose not to add the ribbon or tape simply close the opening using ladder stitch. You can add whatever other embellishments you choose to truly make this project your own.

Easy Padded Sewing Machine Cover
If you want more simple sewing and crafting patterns and tutorials sign up for my free Newsletter and receive your free EBook containing 15 handbag patterns and tutorials.