I saw this project on Facebook and thought it was so cleaver. Jessica Espinosa made this project as a bee craft. I am not that fond of honey so I created my own twist on her project. This idea is perfect as a strawberry jam jar. I really love how it came out thanks to Jessica and her instructions. The round Dollar Tree jar like the one she used was in my stash so I went about creating my own version of this adorable project. I hope you enjoy this simple project. If you would like more Dollar Tree crafts head over to my Dollar Tree page for many more.
Note: This post contains affiliate links that if you click on them and make a purchase I will receive a small commission at no extra cost to you. As an Amazon Associate I earn from qualifying purchases.
What you will Need: How to Make a Dollar Tree Strawberry Jam Jar
- Label you can get by clicking on this link
- 1 Dollar Tree round jar with lid
- Red, Green and white acrylic paint
- Antique wax
- Red and White Gingham ribbon
- 1 small wood spoon
- Twine
- 2 Strawberry Findings
- Dish washer safe Mod Podge
Note: This post contains affiliate links that if you click on them and make a purchase I will receive a small commission at no extra cost to you. As an Amazon Associate I earn from qualifying purchases.
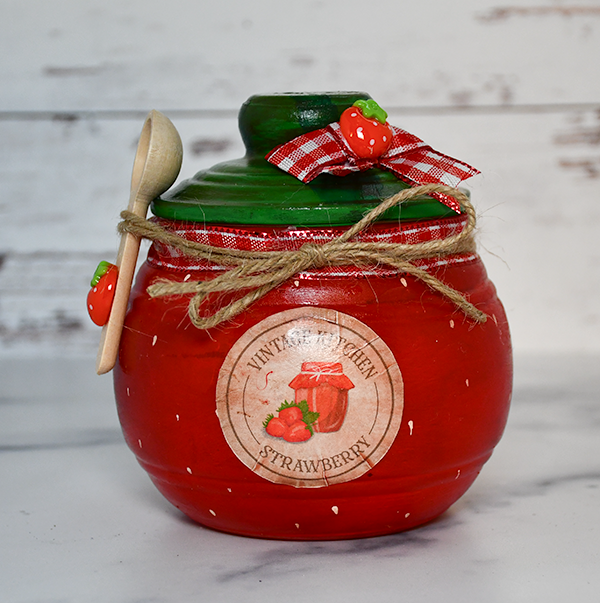
Step 1: Paint the Jar
Using red acrylic paint cover the jar but not the lid red. Use as many coats as you need for this. Let the jar dry completely.


Step 2: Paint the Lid
Paint the lid green using the green acrylic paint. Again, use as many coats as you need to get full coverage.


Step 3: Add the Seeds
Take the end of a paint brush or other round tool and dip it into some white acrylic paint. Place dots all over the red jar to simulate the seeds of the strawberry. Let dry completely.

Step 4: Add the Antiquing Wax
I wanted to add some age and dimension to my jar so I took a baby wipe and added some antique wax to both the jar and the lid.

Step 5: Add the Mod Podge
Cover the center of the front of the jar where you would like the label with Mod Podge. Place the label you printed and cut out on top of the Mod Podge while it is still wet. Place a piece of plastic wrap on top of the label and remove any wrinkles or puckers. Let dry. Once the label is dry cover the whole jar and the top with Mod Podge. Let dry.


Step 6: Add the Ribbon
Take a piece of red and white Gingham Ribbon and wrap it around the top of the jar. Secure with hot glue. Tie a simple double bow. Hot glue the bow to the top of the lid.


Step 7: Add the Spoon
Take a piece of twine and wrap it around the top of the jar twice. On the second time around add the spoon and tie a bow to secure it to the jar.

Step 8: Add the Findings
Hot glue one of the strawberry findings onto the center of the bow and another one in the center of the spoon. Once you have added the findings you have finished the Dollar Tree strawberry Jam jar.


I hope you enjoyed this simple Dollar Tree craft. If you would like more sewing and crafting projects subscribe to our free newsletter and receive your free Dollar Tree eBook.
Subscribe to our Free YouTube Channel!
Join our Sew Very Crafty Fans Facebook group
If you want to ask questions and share your projects join our Facebook group here. The community will help to achieve your sewing and crafting dreams.