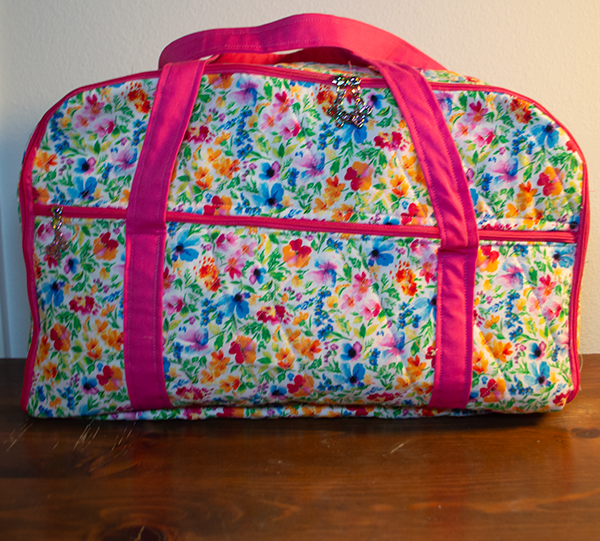
I enjoy traveling and have made several travel bags on the site but this one is a quilted open wide zippered travel bag that is similar to a suitcase but not. This is such a useful bag that is perfect for weekend or overnight. It even has a __ to slip it over a suitcase handle. Even though this bag has two zippers it is a very easy bag to make and a good way to hone your bag making skills. It won't be too long until travel season is on us so I hope you will give it a try a make your own. If you enjoy making handbags like I do and want more head over to our handbag page for many more.
Note: This post contains affiliate links that if you click on them and make a purchase I will receive a small commission at no extra cost to you. As an Amazon Associate I earn from qualifying purchases.
What you Will Need: How to Make a Quilted Open Wide Travel Bag
- 1 yd of outer and lining fabric
- 1/2 yd accent fabric for the zipper pocket
- 1 yd of fusible fleece
- 1 long continuous zipper that you can cut into two different sizes
- Sewing Machine
- Standard Sewing Supplies
Step 1: Cut your Fabrics
Cut two outer, lining and fleece fabrics that measure 19″ x 13″. Cut 2 lining pieces that measure 4 1/2″ x width of fabric for the straps. From the accent fabric cut 1 19″ x 13″ piece of fabric. One each of outer, lining, and fleece that measures 18″ x 15″. One outer, lining and fleece that measure 49″ x 6″. Next, cut one each of fabric, lining and fleece that measure 5 1/2″ x 9″ for the suitcase flap. Finally cut bias binding that is 1 1/2″ wide.

Step 1: Fuse the Fleece
Start by fusing the fleece to the outer fabrics that measure 19″ x 13″, 18″ x 15″, 49″ x 6″ and 5 1/2″ x 9″. Use a hot iron and follow the manufacturer's instructions for this.

Step 2: Quilt the Fabrics
Sandwich the above pieces so that the fleece is in the middle of the outer and lining fabrics. Quilt the fabrics any way you like. I stitched diagonal lines to pieces that are 2″ wide.


Step 3: Cut out the pieces
The fabrics that you have cut are larger than you need to accommodate the quilting. Cut the sides of the fabric to measure 17 3/8″ x 11 7/8″. Cut the accent piece to measure 17 3/8″ x 11 7/8″. Next, cut the bottom piece to measure 17 3/8″ x 5 1/2″. Finally, Cut the gusset piece to measure 37 1/4″ x 5 1/2″. Zigzag the raw edges of all the quilted pieces.

Step 4: Cut the Zippers and add the Pulls
There are two zippers in this project. Cut two zippers from your continuous zipper. One zipper should measure 17 7/8″ and the other should measure 36 1/4″. Add one zipper pull to the smaller zipper and two to the larger zipper so that the pulls are facing each other.

Step 5: Round the Corners
Using a rounding ruler or a small plate round the two top corners of each of the side pieces.

Step 6: Add the Smaller Zipper
Measure down 4 3/4″ from the top center of the one of the sides and make a mark. Draw a line that intersects that mark. Cut along that line dividing that side. Place the small zipper right sides together with the bottom of the side you just cut and stitch the zipper to the that edge. Fold over the zipper so that it is right sides out. Topstitch along the zipper. Add the top part of that side by placing it right sides down onto the other side of the zipper. Stitch the top to the zipper. Turn right sides out and topstitch.


Step 7: Create the Straps
Take the long lining strap fabric and fold the long raw edges to the center and press. Fold the long edges in half lengthwise and press. Topstitch along the long edges enclosing the raw edges.


Step 8: Add the Straps to the Zipper Side of the Bag
Measure 4″ from each side of the zipper side of the bag and make marks. Place the ends of one of the long lining pieces on those marks. Stitch the straps from the bottom of the bag to just below the zipper and stitch across and back down to secure.


Step 9: Add the Accent Fabric
Place the accent fabric so that it is facing right sides down on the wrong side of the zipper panel. Stitch the accent fabric to the zipper panel following the panel's contour. Trim off the excess corners and zipper. Zigzag around the raw edges.


Step 10: Add the Bottom
Place the bottom piece right sides together with the bottom of the zipper panel. Stitch using a 1/4″ seam allowance.


Step 11: Add the long zipper
place the long zipper right sides together with the gusset. Stitch the zipper to the gusset. Fold the zipper to the right side and topstitch.
Step 12: Add the Gusset to the zipper panel
Place the gusset right sides together with the zipper panel starting at the bottom of the bottom piece. Wrap the zipper all the way around the bag to the other side ending at the bottom. Stitch the zipper. Topstitch the zipper.
Step 13: Create the Suitcase Flap
Fuse the fleece to the outer fabric, Place the lining fabric right sides together with the outer fabric that measures” 5 1/2″ x 9″. Stitch just the two long edges using a 1/4″ seam allowance. Turn right sides out and press.


Step 14: ADD the Suitcase Flap
Measure in 4″ from each side of the non-zipper side panel and make a mark. Measure up 3/4″ from the bottom of the panel and make another mark. Place the Suitcase flap on the marks.

Step 15: Add the Straps to the non-zipper side
Measure 4″ in from each side of the panel. Place the strap to the non-zipper side over the sides of the suitcase panel in the same way you did for the zipper side. Stitch up from the bottom to just below the zipper across and back down.

Step 16: Add the Non-Zipper Side
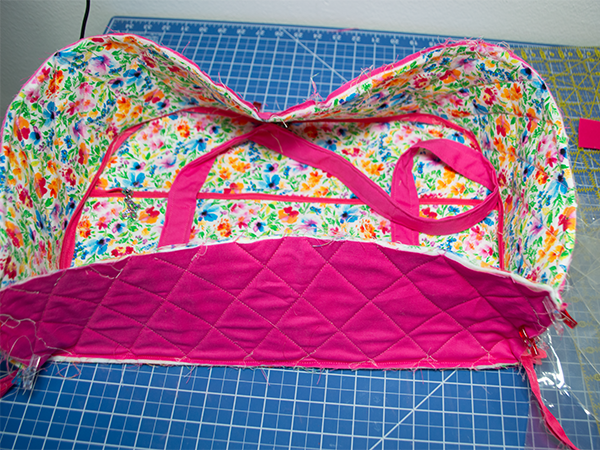
Open the zipper. Turn the bag wrong sides out. Place the non-zipper panel right sides together with the bag. Stitch all the way around using a 1/4″ seam allowance.

Step 17: Add the Bias Binding
Fold the short edge of the bias binding over. Place the binding together with the raw edges of the bag matching the edges. Pin or clip all the way around. Place the short raw end under the folded end where you started. Stitch the binding to the bag. Fold the binding twice to enclose the bag's raw edges and pin or clip. Stitch the binding to the bag either using your machine or by hand. I prefer to stitch by hand. Turn the bag right sides out and you have finished your open wide quilted travel bag. Enjoy.


I hope you enjoyed this simple bag making project. If you would like more sewing and crafting projects subscribe to our free newsletter and receive your free handbag eBook.
If you would like video tutorials of some of Sew Very Crafty's most popular posts subscribe to our free YouTube channel here.
Join our Sew Very Crafty Fans Facebook group
If you want to ask questions and share your projects join our Facebook group here. The community will help to achieve your sewing and crafting dreams.