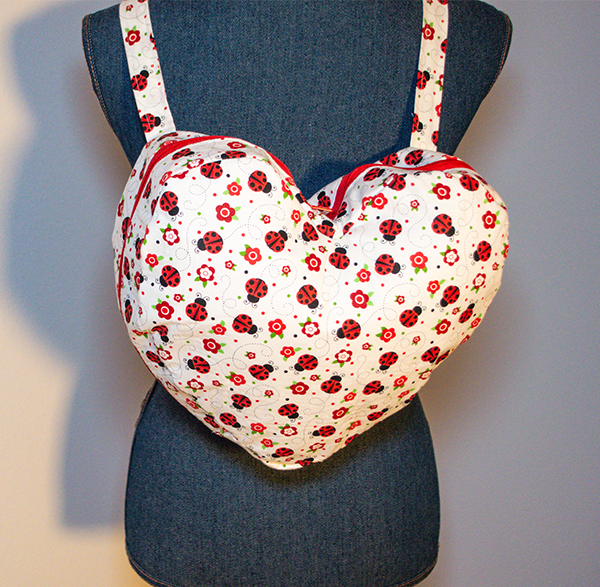
I saw a heart shaped backpack on Pinterest so I thought I would make my own version of this really cute sewing project with free pattern. It took a bit to create the pattern but the sewing comes together pretty simply even though there are two zippers. This project is not just for Valentine's Day but for everyday. This is a simple sewing project so even if you are just starting out give it a try. If you would like more holiday projects head over to my Holiday Project Vault. For more handbag and backpack patterns head over to my handbag page.
Note: This post contains affiliate links that if you click on them and make a purchase I will receive a small commission at no extra cost to you. As an Amazon Associate I earn from qualifying purchases.
What You will need: How to Sew a Heart Backpack with Free Pattern
- Pattern you can get by clicking on this link
- 1 yd outer fabric
- 1 yd lining fabric
- 1 yd Pellon 808
- 1 yd Fusible fleece
- 35″ zipper — I used a continuous zipper
- 8″ zipper
- Two 1″ tri-glides
- Two 1″ D-Rings
- Two 1″ Swivel Clips
- Sewing machine
- Standard sewing supplies
Step 1: Cut your Fabrics
Using the free pattern cut two outer pieces, lining pieces, Pellon 808 and fusible fleece. Cut two gusset pieces that measure 2″ x 34 1/2″ from the outer, lining, 808 and fleece. Cut one tab that measure 4 3/4″ x 4″ from the outer, lining, fleece and 808. Also using the lining piece cut the outer zipper pocket and Pellon 808 to measure 8″ x 10″. Cut two straps that measure 4″ x width of fabric. Finally, cut two D-Ring tabs that Measure 4″ x 4″.
Step 2: Add the Zipper pulls
Add two zipper pulls in opposite directions if you are using a continuous zipper. Once the pulls have been added add another zipper tab to the other end of the zipper. Set aside.

Step 3: Create the Straps
Fold the long raw edges to the center and press. Fold in half lengthwise and press again topstitch along both long edges. Repeat for the second strap.


Step 4: Add the Tri-Glides
Slide the tri-glides onto the straps.

Step 5: Add the Swivel Clips
Place the swivel clips underneath the tri-glides. Fold the bottom of the strap over the swivel clip and underneath the center of the tri-glide and back over the top of the tri-glide. Fold under the raw edge and stitch to the strap just through the folded edge and the first layer of fabric.


Step 6: Create the D-Ring Tabs
Create two D-Ring tabs in the same way you created the straps. Fold them through the D-rings. Clip and set aside.


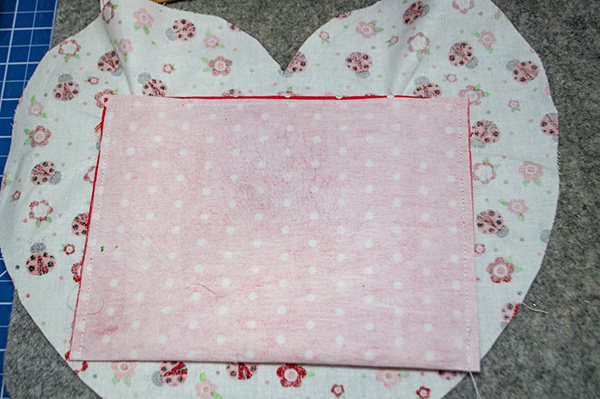
Step 7: Create the Outer zipper Pocket
Take the lining zipper pocket piece and fuse a piece of Pellon 808 to the wrong side. Measure down 1″ Draw a line through that mark that measures 8″. Measure down 3/8″ and draw lines on each end then across creating a box. Draw a line down the center with triangles at each end. Place the pocket piece right sides together with one of the heart pieces 1″ down from the downward center peak. Stitch all the way around the box through all layers. Cut down the line in the center and the triangles through all layers. Push the lining piece through the opening you created and press.


Step 8: Fold up the Pocket Piece
Fold the pocket piece so that the bottom raw edge meets the top raw edge of the zipper opening. Stitch all the way around the zipper pocket only.
Step 9: Fuse the Interfacing and Fleece
Fuse a piece of Pellon 808 to each heart shaped outer piece. Add the fleece on top. Use a hot iron and follow the manufacturer's instructions.


Step 9: Create the Long Zipper and Gusset
Place the long zipper right sides together with one of the gusset pieces. Add the lining gusset so that it is right sides together with the outer piece sandwiching the zipper. Stitch through all layers. Turn right sides out and topstitch. Add the second gusset piece to the other side of the zipper and stitch. Once both sides of the zipper have been stitched add the 4 3/4″ x 4″ outer tab right sides together with the gusset. Place the lining tab right sides together with the lining so that the gusset is in between the outer and lining tabs. Stitch using a 1/4″ seam allowance.
Place the other end of the tab right sides together with the other end of the gusset. Roll up the gusset so that the other end of the lining tab can be placed right sides together with of the other end of the gusset. Stitch through all layers.


Step 10: Add the D-Ring Tabs
Place the D-ring tabs with the D-Rings in the location indicated on the pattern on the heart shape without the zipper. Stitch using a 1/8″ seam allowance to secure.

Step 11: Add the Straps
Place the straps on the location indicated on the pattern matching the raw edges. The swivel clips should be on the other end. Secure the straps using a 1/8″ seam allowance.

Step 12: Stitch the Gusset to the Heart
Place one outer gusset pieces right sides together with one of the outer heart pieces. Stitch only the outer heart and the outer gusset together using a 1/4″ seam allowance. Repeat for the other gusset and second heart shape.

Step 13: Add the Lining Gussets
Place one of the lining gussets right sides together with one of the lining hearts and stitch all the way around using a 1/4″ seam allowance leaving an opening for turning. Make sure that the zipper is open. Turn right sides out. Repeat this process for the other lining gusset and lining heart. You will have to put the outer hearts and straps inside the lining hearts and gussets. You will also notice that you will not be able to stitch where you joined the gusset tabs to the gusset. Leave these areas open. Once both lining sides are complete close all of the openings using ladder stitch.


Step 14: Clip on the Straps
Clip the straps to the D-rings and you have finished your heart back pack with free pattern.


I hope you enjoyed this backpack project. For more sewing and crafting projects subscribe to our free newsletter and receive your free handbag eBook.
If you would like video tutorials of some of Sew Very Crafty's most popular posts subscribe to our free YouTube channel here.