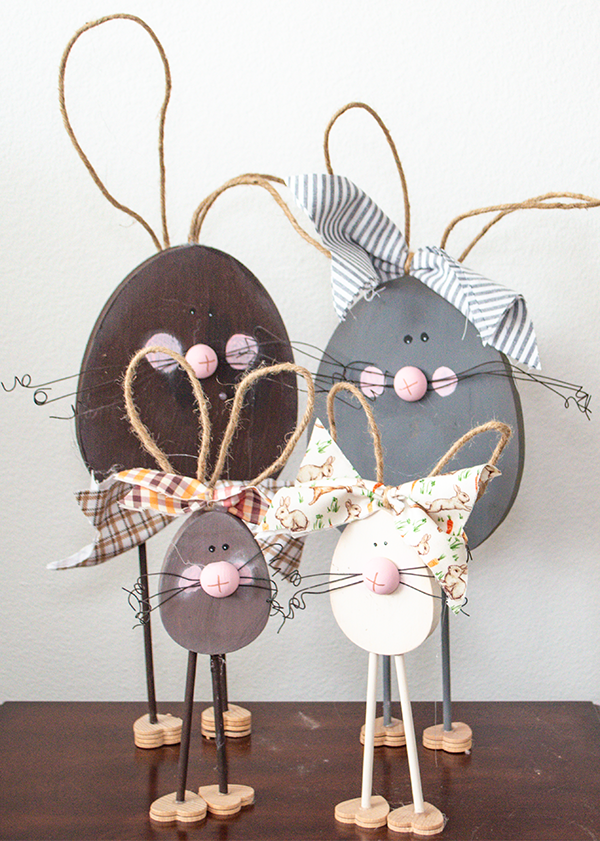
I absolutely love these cute Dollar Tree bunnies. They are so adorable and really easy to make. Honestly anyone can make these and they are perfect for the upcoming Easter season. Dollar Tree comes to the rescue again with holiday craft supplies. I started with the wood textured easter egg to create my bunnies. I had one large egg that I got from Dollar Tree and two small ones that I purchased from Amazon. From there it was super simple to make these just so cute. If you would like more Dollar Tree Crafts head over to my Dollar Tree page. For more holiday sewing and crafting projects check out my Holiday Project Vault.
Note: This post contains affiliate links that if you click on them and make a purchase I will receive a small commission at no extra cost to you. As an Amazon Associate I earn from qualifying purchases.
What you will Need: How to Make Cute Dollar Tree Bunnies
- Dollar Tree wood eggs
- Amazon wood eggs
- Dollar Tree Dowels
- Jute wire
- Thick floral wire
- Wood half rounds
- Fabric or ribbon for bows
- Brown chalk paint
- Milk Jug chalk paint
- Pink Paint
- Black Paint
- Gray paint
- Heart cutouts
- Rouge or pink chalk paint
- Drill
- Hot glue
- Ground Espresso distress oxide
Step 1: Paint the Eggs
Paint the eggs any color you would like. I painted my large egg with a light brown chalk paint. The smaller eggs were painted white and a soft brown color. The dowels were painted the same color as the eggs.

Step 2: Age the Eggs
Use the espresso around the edges of the eggs with a little in the center to age the eggs. I used a large round brush for this.

Step 3: Add the rouge or pink paint
On the upper part of the eggs on each side place a circle of rouge or pink paint.

Step 4: Paint the wood half rounds
I painted some of my half rounds pink. Paint an X on the half rounds.


Step 5: Paint the Floral Wire
I painted the floral wire dark brown. The floral wire will be the whiskers of the bunnies.

Step 6: Add the Wire
Start by creating a small loops at the end of each piece of wire. I used three pieces of wire for each bunny. Hot glue the wire to the upper center of the eggs so one end of each piece meets in the center. Glue the half round to the center of the wire.

Step 7: Add the Eyes
Place dots of black paint above the nose so that the two black dots are relatively close together. When the paint dries add a dot of white.

Step 9: Add the Ears
Take the jute wire and fold it into an ear shapes. Attach the ear shapes using hot glue to the back of the egg so that they face toward the outsides of the eggs and that the ends are near the center.

Step 10: Drill the holes
Using a drill, make holes in the bottom of the eggs to act as the legs.

Step 11: Add the Legs
Place some wood glue inside the holes. Then add the dowels to the holes. You can cut the dowels any length you like. Just make sure each egg has the same size and length of dowel.

Step 12: Glue the legs to the hearts
Glue several hearts together and drill holes in the middle. The hearts will act as the feet of the bunnies. Add hot glue to the holes and insert the legs.

Step 14: Add the bows
Create bows from the ribbon or fabric. Tie them off with a piece of twine. Hot glue the bows to the center of the top of the eggs.

I hope you enjoyed this simple Dollar Tree craft. If you would like more sewing and crafting projects subscribe to our free Newsletter and receive your free Holiday Dollar Tree eBook.
If you would like video tutorials of some of Sew Very Crafty's most popular posts subscribe to our free YouTube channel here.