
How to Make Fabric Covered Plant Pots
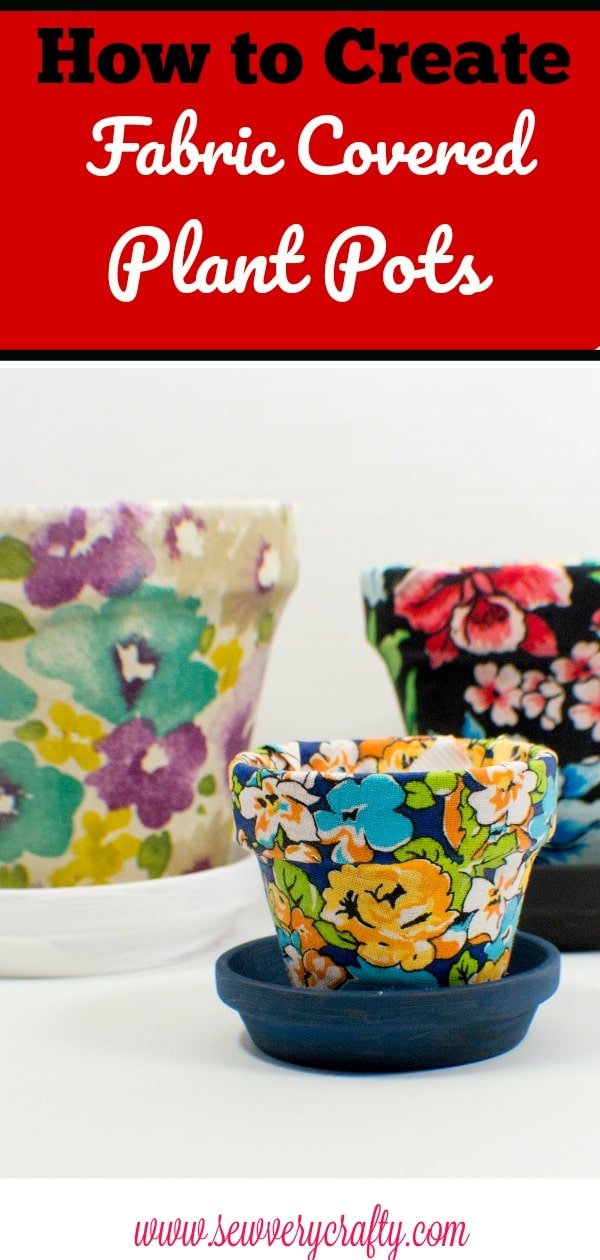
How to make fabric covered plant pots. I delved into my stash once again for this beautiful but simple project. I have plants all through my home. They are both pretty to look at and healthy for the environment. According to the Health Economist house plants not only have the ability to clean the air but they can also remove toxins like benzene, formaldehyde and trichloroethylene from the air.
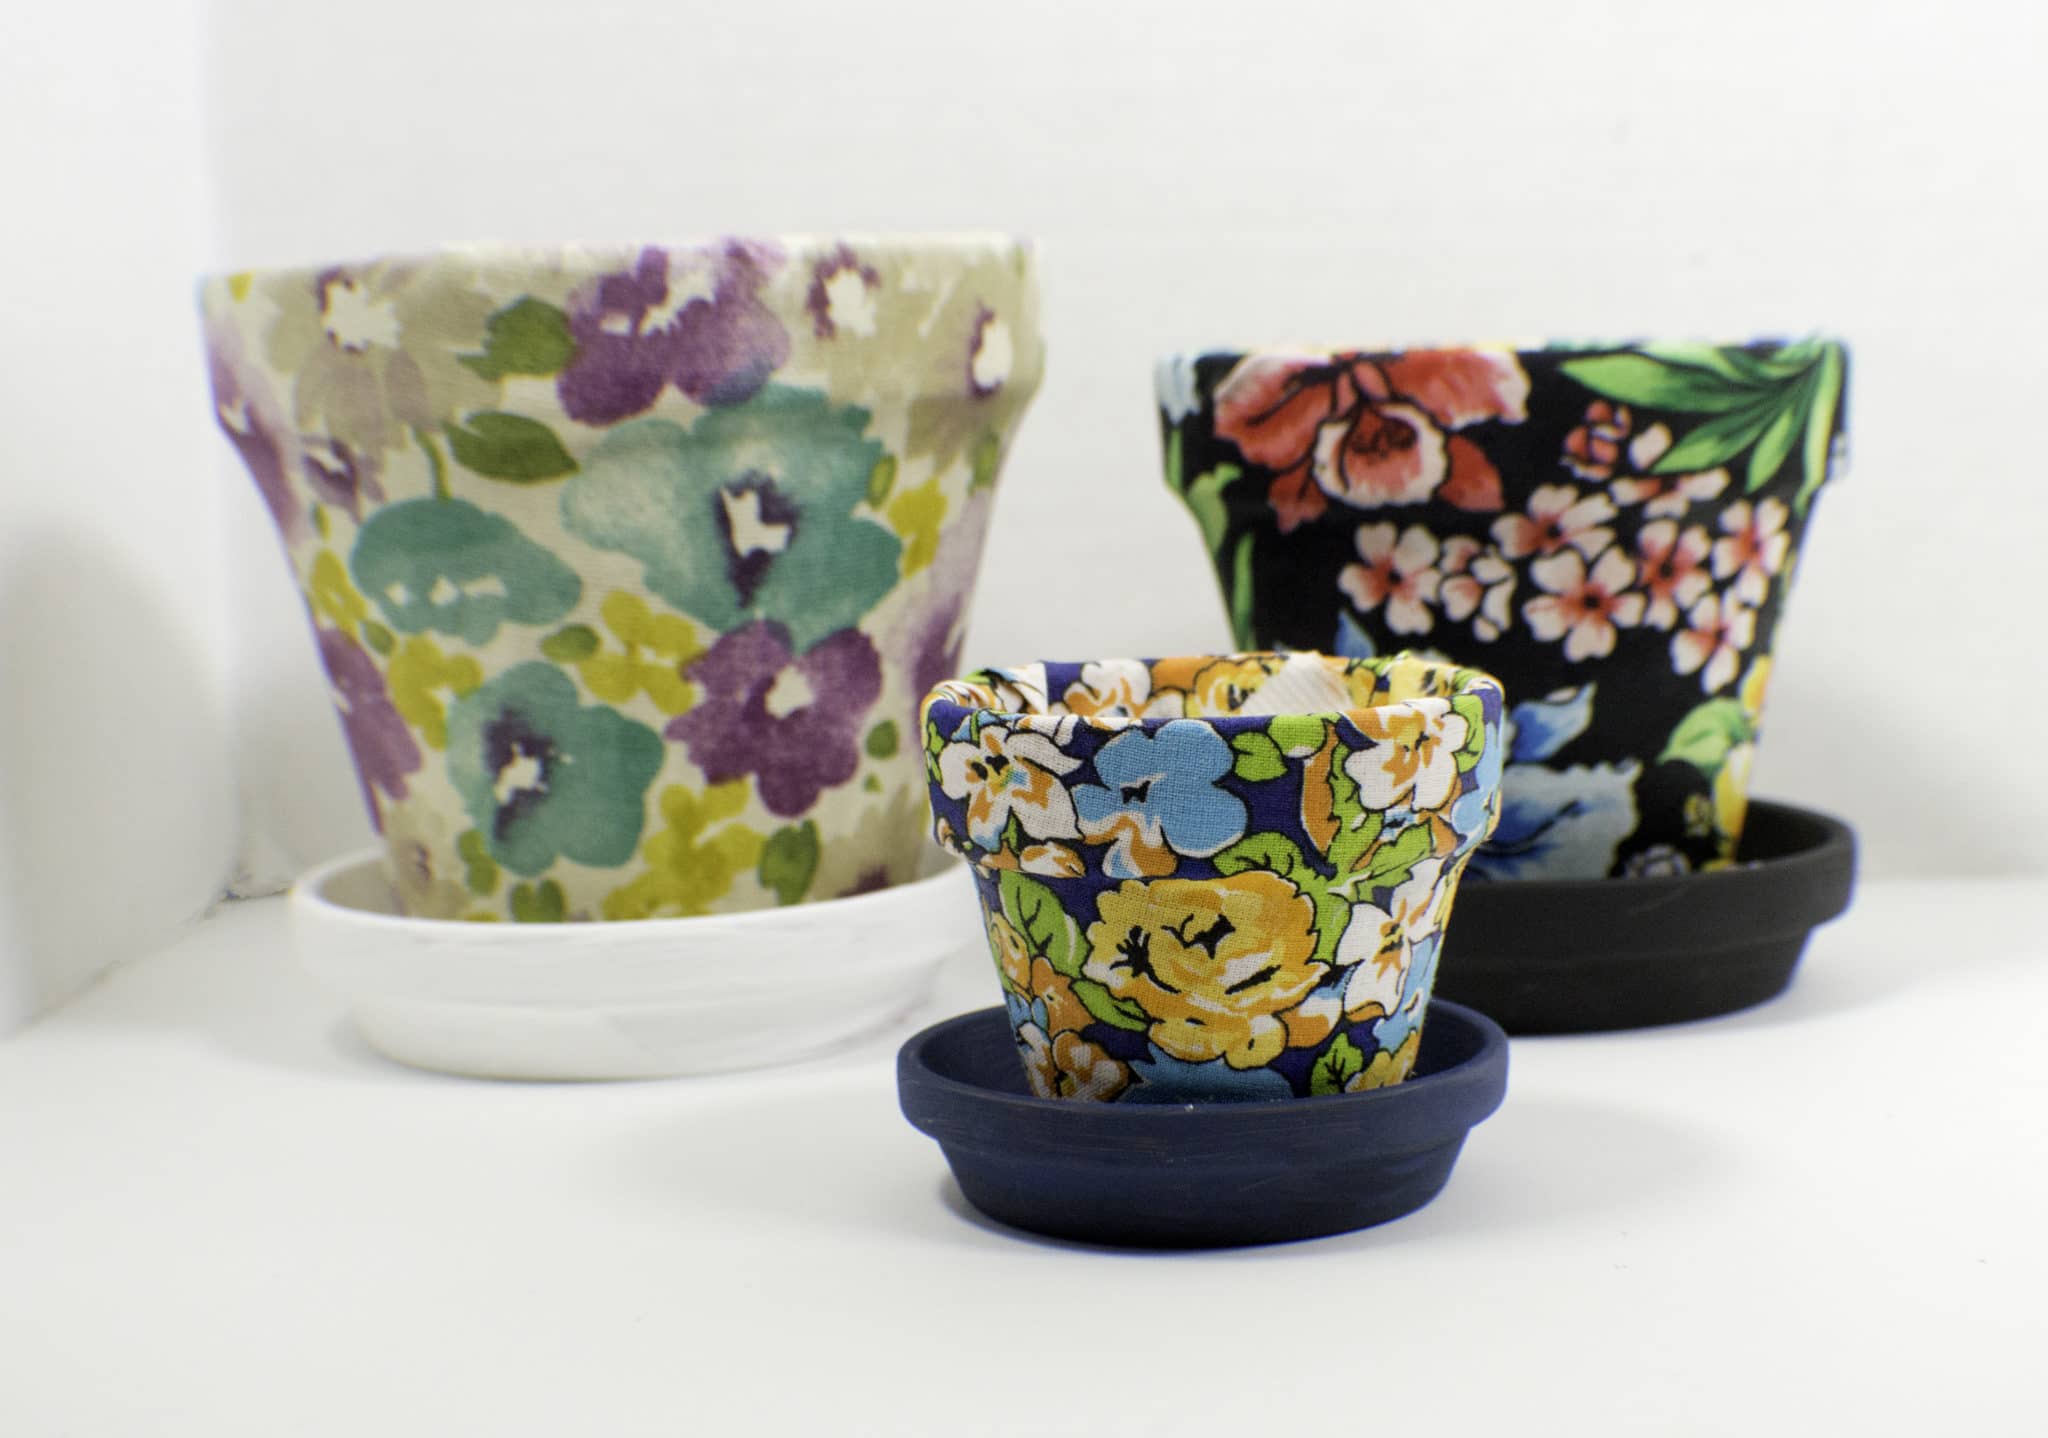
I could use plain terracotta pots for my plants or purchase some decorative pots which can be expensive but I decided to purchase inexpensive terracotta pots and cover them with fabric. I used some beautiful florals for my fabric covered plant pots but you could choose any fabric that goes with your decor. There are thousands of different fabrics at JOANN Fabric & Craft Stores![]() Amazon Fabrics, and onlinefabricstore.net if you don't have a massive stash like mine. If you do, it only takes a fat quarter to cover a medium sized pot. This post contains affiliate links that if you click on them and make a purchase I may receive a small commission at no extra cost to you.
Amazon Fabrics, and onlinefabricstore.net if you don't have a massive stash like mine. If you do, it only takes a fat quarter to cover a medium sized pot. This post contains affiliate links that if you click on them and make a purchase I may receive a small commission at no extra cost to you.
If you are not familiar with fat quarters they are pre-cut pieces of fabric that measure a quarter yard or generally 18″ x 22″. Unlike a quarter yard of fabric from the bolt that typically measures 44″ x 9″, a fat quarter is cut from one yard of fabric, cut in half lengthwise,and then in half width-wise. This provides a squarer shape to the quarter yard of fabric rather than a wider strip. The squarer shape has a broader range of uses than just a quarter yard strip of fabric.
You can often find fat quarters on sale at your local fabric store. So long as your pot is not too large this is a perfect fat quarter project. Otherwise you can use remnants that are always 50% off at your local fabric store. Remnants are the fabric that is left at the end of the bolt that measures a yard or less. They are typically rolled up and placed into the remnant bin at your local fabric store and marked down by 50%. I use remnants for many of my projects for Sew Very Crafty.
For this project I chose a fat quarter of floral cotton, some left over cotton decorator weight fabric and another piece of quilting cotton I had in my stash. Cotton is really the best choice of fabric for this covered pot project. It is easy to manipulate and sticks well to the Mod Podge.
Keep in mind that if you are using light colored cottons you may want to paint your pots white so the terracotta color does not show through. If you use decorator weight fabric this is less of a problem because of its thickness. I did not need to paint my pots for this project but you may have too.
What you will Need:
- Terracotta Pot
- Cotton Fabric
- Mod Podge

- Sponge brush
- Acrylic Paints
- Scissors

Step 1: How to Make Fabric Covered Plant Pots
Cut a rectangle of fabric that will cover your whole pot. You can roll the pot along the wrong side of your fabric to create a template with a pencil but it is easier to just use the rectangle.

Step 2: How to Make Fabric Covered Plant Pots
Cover the outside of the pot and the interior rim of the pot with Mod Podge. It is easier to use a foam brush for this purpose. If you are not familiar with Mod Podge it is a decoupage medium. Mod Podge is an all-in-one glue, sealer and finish used to attach paper and fabric to various surfaces. it comes in matte and glossy. I chose a matte finish for this project but you could just as easily choose glossy of you like. Mod Podge can be purchased through my affiliate link Amazon or at your local craft store like Michaels. It goes on white but dries clear.

Step 3: How to Make Fabric Covered Plant Pots
Cover the pot with fabric so that there is about a 1″ overlap on the top and the bottom. Form the fabric to the pot so that you have that pot shape.

Step 4: How to Make Fabric Covered Plant Pots
Trim off any excess fabric. I trimmed the fabric after it was on the pot as it was easier for me but if you made a template you will not need to trim the excess. Cut slits into the fabric at the top and the bottom so the fabric will lay flatter. Fold over the rim and the bottom of the pot.
Step 5: How to Make Fabric Covered Plant Pots
Cover all of the fabric both inside and outside of the pot with Mod Podge. You will have to do this in two steps in order to cover the bottom and the rim. I used wax paper to make sure that my pots did not stick to my crafting surface. I would also add a second coat of Mod Podge to totally secure the fabric to the pot and make sure you have total coverage. You will notice that when the mod Podge dries it creates a relatively hard surface over the fabric. The surface is water resistant but not water proof.

Step 6: How to Make Fabric Covered Plant Pots
Paint the plant pot tray to coordinate with the fabric you have chosen. This gives a more cohesive look to your fabric covered plant pots. You can use acrylic paints that you can get at any craft store for this purpose. Add some soil and plants and you have completed these beautiful but inexpensive fabric covered plant pots.
If you would like more sewing and crafting projects sign up for our newsletter and receive your free eBook of 15 handbag patterns and tutorials.


Hello! This looks beautiful and easy!
Would it work using plastic pots?
I am not sure if it will or not but I think so.
I think you would have to seal the terra cotta pot before doing anything; you would not have to seal the plastic ones.
I did not have to seal the terracotta and the pots work fine. It may be that the Mod Podge works as a sealer.
If the pots are water resistant but not water proof what else can u use over the mod podge to make it water proof??
You could try ModPodge Dishwasher safe. that may work for you. https://amzn.to/3FN1tBD