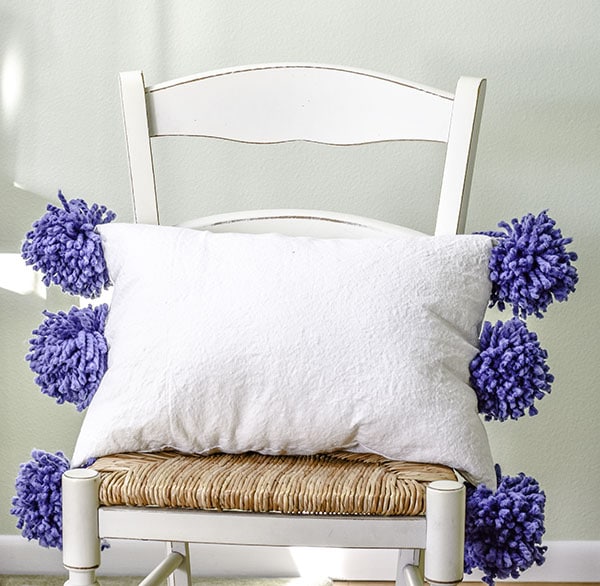
Make a Drop Cloth Pom Pom Throw Pillow
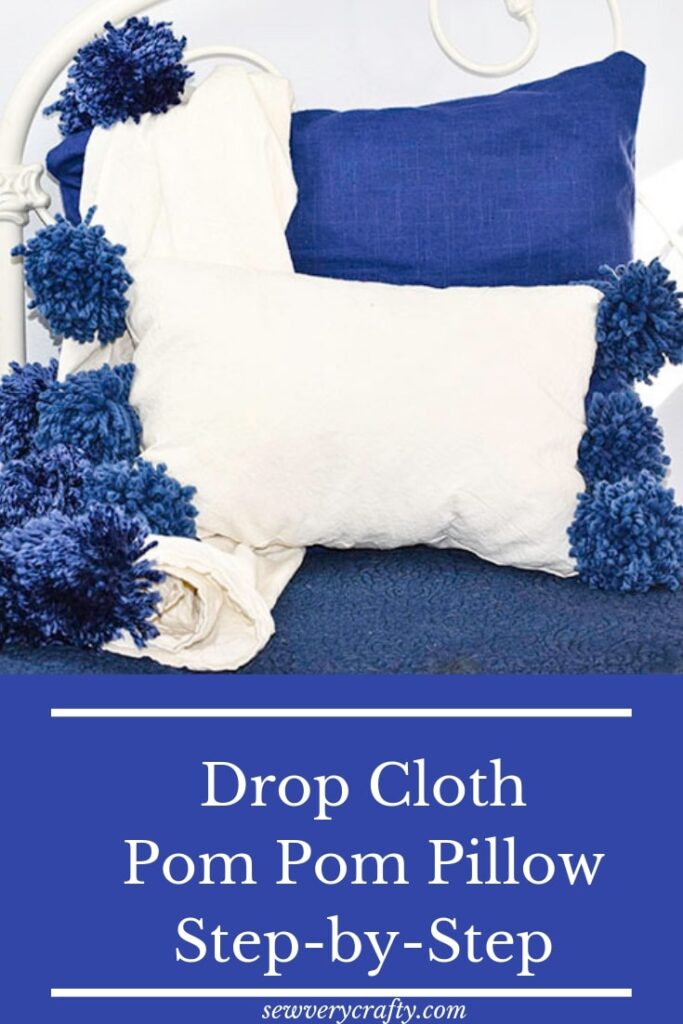
I recently created an Anthropolgie inspired drop cloth pom pom throw and had extra drop cloth and pom poms so I decided to create a matching throw pillow to go with it. This is just as easy a project as the throw but in case you didn't see my post on how to make the throw I will repeat the basic instructions here. All you need for this terrific pillow is some drop cloth and yarn to complete this matching throw pillow. I bleached my drop cloth to match my decor but you do not need to if you like the natural look.
The most important part of this project is choosing the right drop cloth. You really need to purchase a drop cloth that is 100% cotton if you are going to bleach it. Believe me, I learned this the hard way. I bought one that was only 54% cotton and waited forever for it to bleach white and it never happened so I read somewhere that the key was that the cloth needed to be 100% cotton. I purchased this one from Amazon and it worked like a charm. This post contains affiliate links that if you click on them and make a purchase I may receive a small commission at no extra cost to you.
Keep in mind that these drop cloths are large so I recommend that you get the smallest one you can get to make this project and the throw. You will still have drop cloth left over. Hopefully I will come up with other drop cloth projects to make out of all of the fabric I have left over.
What you will Need:
- 100% cotton drop cloth
- Yarn in any color you like. I used Bernat Softee Baby Chunky
- Bleach (Optional)
- Yarn Needle
- Standard Sewing Supplies
Step 1: Make a Drop Cloth Pom Pom Throw Pillow
Bleach your drop cloth. This is an optional step. But if you want your drop cloth to be white just follow these instructions:
The best way to bleach your drop cloth is to place it in a top loading washer. Place the drop cloth into the washer and fill it with hot water. Pour in about a third of the container of bleach into the washer and agitate for a bit to spread out the bleach. Stop the washer and let the cloth soak for several hours while the bleach does its magic. Keep an eye on the cloth because if you leave it in too long it may start to yellow.
If, like me, you do not have a top loading washer you can do it the old fashioned way. I filled my bathtub with hot water and put in the drop cloth and the bleach. I agitated it with the end of a broom stick so the bleach is fully integrated with the water and the cloth. After 3-4 hours I drained out the bleached water. I rinsed the drop cloth thoroughly using hot water and wrung as much water out of it as I could.
Once the drop cloth has been bleached wash it in your washing machine using hot water and fabric softener and dry thoroughly. If it is not as soft as you want it wash and dry it again.

Step 2: Make a Drop Cloth Pom Pom Throw Pillow
Cut two pieces of drop cloth to measure 20 1/2″ x 14 1/2″. This pillow is going to have a final measurement of 20″ x 14″.
Step 3: Make a Drop Cloth Pom Pom Throw Pillow
Sew the two pieces together using a 1/4″ seam allowance and leaving a 4″ opening on the bottom for turning.
Step 4: Make a Drop Cloth Pom Pom Throw Pillow
Clip the corners without cutting the stitching and turn the pillow right side out. Push out the corners. I did not press my pillow because I liked the wrinkly texture but you could iron yours at this point.
Step 5: Make a Drop Cloth Pom Pom Throw Pillow
Stuff the pillow with Polyester fiberfill to the plumpness that you like. Sew the opening closed using ladder stitch. If you are unfamiliar with ladder stitch check out this video.

Step 6: Make a Drop Cloth Pom Pom Throw Pillow
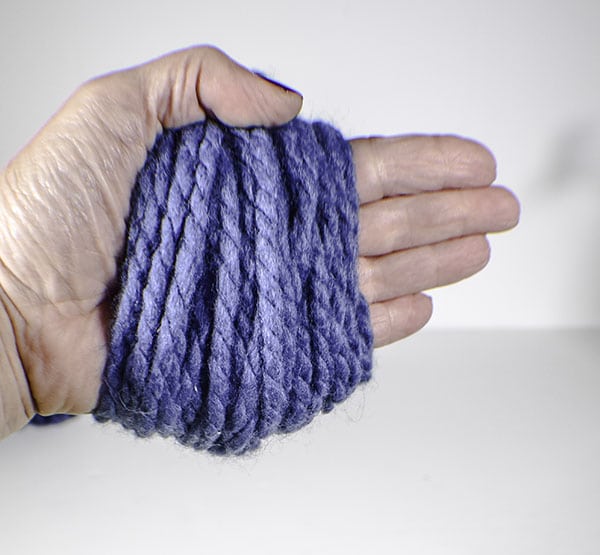
Make your pom poms. I made jumbo pom poms so I did not use a pom pom maker though you could if you wanted. I just used my hand and chunky yarn to get the look and feel that I wanted. Wrap the yarn around the palm of your hand about 90 times. The chunky yarn makes nice big pom poms. If you are not using chunky yarn you will want to wrap more revolutions, perhaps 120. Keep the yarn on your palm and not the fingers. If you want smaller pom poms wrap the yarn around your fingers. The fewer fingers the smaller the pom pom. You could also use a pom pom maker but I found that the large pom pom maker was not large enough for the pom poms for this project.
Step 7: How To Make A Drop Cloth Pom Pom Throw
Once you have completed wrapping the yarn, gently slide the yarn from your hand and place the bundle onto your work table. Take a piece of yarn about 8″ long and wrap it around the center of the yarn loops and tie a knot tightly.


Step 8: How To Make A Drop Cloth Pom Pom Throw
Cut through all of the loops to create the pom pom. As the yarn pops out you will notice that it is not perfectly round. That is normal. Just trim around the pom pom to make it even and you have completed your pom pom.


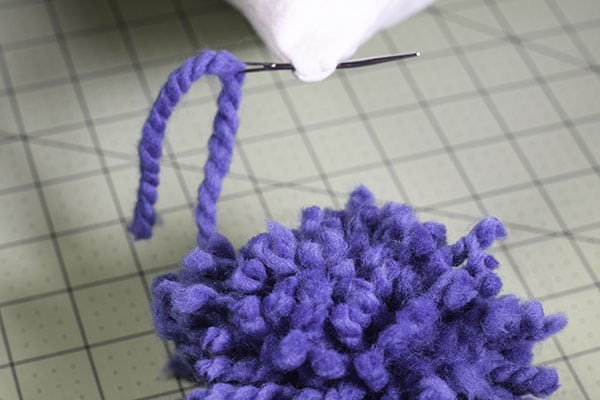
Step 9: How To Make A Drop Cloth Pom Pom Throw
Using the yarn needle add the pom poms to your pillow. I added my pom poms to the corners and the middle of the short ends of the pillow. Simply thread one of the center ties through the yarn needle and insert into the corner and side seams of the pillow. Pull the thread through and tie it to the other center tie. Double knot it and cut off the excess yarn. You should have three pom poms on each short end of the pillow.


If you enjoyed this project try out the matching drop cloth pom pom throw. If you would like to make the bunny in the photo checkout my tutorial on how to make a cuddly bunny
Want more sewing and crafting projects? Sign up for our newsletter and receive your free eBook of 15 handbag patterns and tutorials.