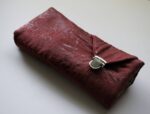
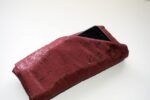
Cell Phone Wallet

I found this free pattern on my affiliate Craftsy but while I liked the design I did not really understand the tutorial so I thought I would make the wallet and do my own tutorial for you here. As I said you can find the pattern free over at Craftsy and if you find the original tutorial to your liking feel free to follow it but here is mine. Craftsy rates this pattern at a beginners level but I really think it rates more of an intermediate. I have changed all of the measurements from metric to American measurement units to make it easier for me and hopefully for you. Here we go.
What You will Need: Cell Phone Wallet
- Pattern
- 1/4 yd. exterior fabric
- 1/4 yd. interior fabric
- 1/2 yd. accent fabric to use for the pockets
- 1/2 yd. fusible interfacing like Pellon 808
- 1/4 yd fusible fleece
- 1 9 inch coordinating zipper
- 1 purse press lock

Step 1: Cell Phone Wallet
Cut out all of the pattern pieces and cut out an additional piece of accent fabric and interfacing for your card pockets that measures 10″ x 19 1/2″. Fuse the interfacing to all pieces. Once the interfacing has been fused, fuse the fleece to the main body of the fabric on top of the interfacing.
Step 2: Cell Phone Wallet
Take the piece that you cut for the card pocket and fold it lengthwise accordion style. Measure down from the short edge 3 1/2″ (9 cm)and place a pin on the side. Measure from that pin another 2 6/16″ (6 cm) and place a pin on the side. Then another 2 6/16″ until there are 6 pins in place and 4″ remains at the bottom. Starting at the 4″ end fold the fabric under to the first pin then fold the second pinned side under the first and the third pinned side under the second. You should have three folds with the original 4″ end wrapped around all of them.


Step 3: Cell Phone Wallet
Top stitch each of the three folds separately. Do not sew them together. Sew a 1/4″ seam along the bottom and divide the pockets in half and sew a seam down the center.

Step 4: Cell Phone Wallet
Create a zipper pocket using the pocket pieces A and B and my adding-zippered-pocket tutorial. Simply use pattern piece A for one side of the zipper and pattern piece B for the other side.

Step 5: Cell Phone Wallet
Add the zipper pocket and the card pocket to the lining fabric. Place the zipper pocket at the bottom, matching the raw edges and add the card pocket 1″ above the zipper pocket. Stitch along the sides.

Step 6: Cell Phone Wallet
I chose to leave pocket D off of my wallet but if you choose to add it you could do it this way: With right sides together sew pattern piece D around the edges leaving an opening for turning. Place the pocket at the top of the wallet. Sew across the top of the slip pocket for a finished look then attach the pocket by sewing around the other three sides.
Step 7: Cell Phone Wallet
Place the right side of the outer pocket over the right side of the lining pocket and sew together leaving an opening for turning. Trim and clip turn at the top so that it will lay flat and the clasp will be easier to install.

Step 8: Cell Phone Wallet
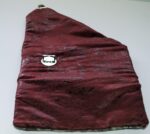
Turn the wallet right sides facing out. Make sure the top turned end is flat and curved. Add the press part of the clasp by unscrewing the two screws at the back using an eye glass screw driver and sliding the press part on and then re-screwing the screws. There are actually points at the end of the screws that will grab onto the fabric. Once this step is complete. Fold the wallet in thirds and measure for the clasp.

Step 9: Cell Phone Wallet
The clasp has four legs and comes with a grommet that has four slits. Place the clasp loosely on the wallet to find the best location for the clasp. Then using the grommet mark the slits. Using a seam ripper or small scissors cut the slips open so that you can insert the four legs of the clasp into the slits. Reach under the wallet through the opening you left for turning and guide the clasp through the slits. Then place the grommet through the legs and fold over the legs to secure. Now the entire clasp has been installed.

Step 10: Cell Phone Wallet
Using a ladder stitch close the opening of the wallet and top stitch around for a finished look. Now you have completed your cell phone wallet. By the way I found an excellent YouTube video on how to do ladder stitch that I thought I would share with you.

https://www.youtube.com/watch?v=WbE5hXt27uU%20