
How to Make a DIY Wash Bag

I really needed a wash bag so I decided to modify my reusable produce bag pattern and turn it into a zippered DIY Wash Bag for my lingerie and other small items. I have a load of 20″ zippers that were given to me as a gift so decided that would be the size that I would use. Using what I have on hand whenever possible is always my goal. I also had some mesh fabric that was left over from the produce bag project that is perfect for this DIY wash bag. With a little bit of cotton fabric this project came together without me even having to go to the fabric store. I just love how it came out and it is perfect for my needs.
You can get all of the items needed in this project at your local fabric store like JOANN Fabric & Craft Stores or Hobby Lobby or you can head online to Fabric.com and Onlinefabricstore.net for fabrics and zippers there. Maybe you will be lucky and have what you need. This post contains affiliate links that if you click on them and make a purchase I may receive a small commission at no extra cost to you. For this project I used my brand new Janome sewing machine that I purchased at Sewing Machines Plus. I absolutely love it. If you are in the market for a new machine head over there and take a look. They have a wide selection and offer free shipping too.
If you would like a video tutorial of this project head over to YouTube and watch my video and while you are there subscribe to my free YouTube channel.

What you will Need: How to Make a DIY Wash Bag
-
1/2 yard of mesh fabric
-
1/8 yd cotton fabric
-
1 20″ zipper
Step1: Cut your Fabrics
Cut one piece of mesh fabric that measures 20″ x 30″. Cut two cotton fabric pieces that measure 4″ x 20″.
Step 2: Stitch the Cotton to the Mesh
Place one cotton piece right sides together with one raw edge of the mesh piece and stitch using a 1/2″ seam allowance. Fold the un-sewn raw edge over by 1/2″ and press. Place the folded edge over the stitched edge and stitch enclosing the first raw edge. Repeat for the other end of the mesh using the other cotton fabric piece. You should now have a long mesh piece with two ends covered in cotton fabric.


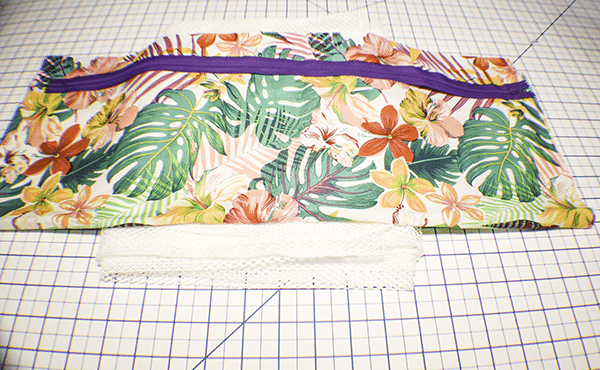
Step 3: Add the Zipper to the Wash Bag
Place the zipper right sides up on your work space. Place one side of the cotton down on the zipper just below the zipper teeth and stitch using a zipper foot. Topstitch along the zipper. Place the other side of the cotton onto the other side of the zipper creating a tube and stitch in the same way.


Step 4: Stitch the Sides
You are going to stitch the sides using a French seam. To do this. Keep the bag wrong sides together. Stitch the sides using a 1/4″ seam allowance. This seems counterintuitive but it is not. Turn the bag right sides together and stitch along the sides using a 3/8″ seam allowance. This will enclose the raw edges. French seams are just that simple. Turn the bag right sides out and you have finished your DIY wash bag.


I hope you enjoyed this wash bag project. If you would like more sewing and crafting projects sign up for our newsletter and receive access to our free printables library
If you would like video tutorials of some of Sew Very Crafty’s most popular posts subscribe to our free YouTube channel here.


